Building a Simple android QR code reader

Adopt and change before any major trends of changes.
, Jack Ma
3 June 2020
Introduction
The recent Covid 19 has brought about many changes in our society. To fight against the spread of Covid 19, Singapore requires the use of SafeEntry for registering entries and exits to various places. The SafeEntry system encodes specific URL into QR code that can be scanned by smartphone, which launches a browser to the specified URL for checking in and out.
This article shows how to create a simple android application that can scan a QR code containing a URL and launches a browser to open the URL. It uses the popular Zxing android embedded library for processing the QR code.
Design and Approach
Some of the newer android phones come with a built in functionality for scanning QR code. However, for older phones, there is a need to download a QR code scanner/reader application. While there are many free QR code applications in the Google playstore, a lot of them have advertisements or require a lot of permissions.
It is relatively easy to build a simple QR code reader application using the zxing embedded android library. You can then use your own QR code reader application, without advertisements and without excessive permissions, for the SafeEntry check in and check out. This is also an opportunity to learn kotlin and android development.
The zxing embedded android library from journeyapps does all the heavy lifting. Basically, there isn't a lot of logic required for the android application. However, for someone new to android development, there are still many things to learn.
We will build the app using a Ubuntu 18.04 LTS Desktop, with OpenJDK 11 (LTS) and the latest Andriod Studio 4.0. We will use the 3.6.0 release of the zxing embedded android library for compatibility with older android devices. This article assumes that all the required software has been installed and setup. The application will be written in kotlin, the new language for programming android applications.
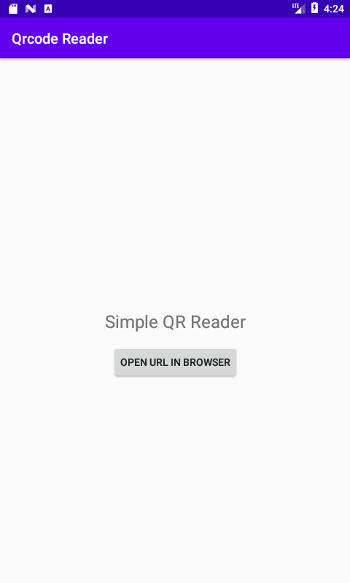
The QR code reader application contains a single main activity, with a textview and a button. The application will start the zxing Qr code scanner upon start, obtain the scan result, display the detected content in the textview and launch a browser with the url address when the button is clicked.
The following shows a screenshot of what the user interface will look like.
We will use the android emulator to test the application and then an actual LG android 7 phone that I am using.
Creating the Emulator Device
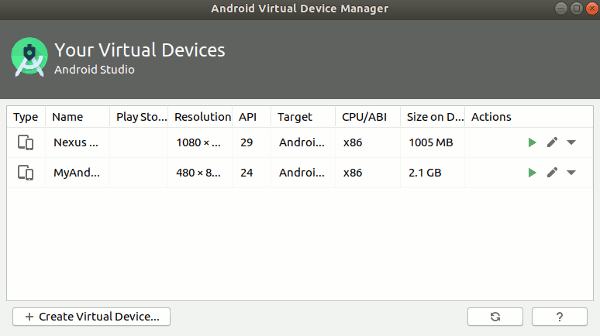
For ease of testing, we can create a emulator device using the Android Studio AVD manager. Start up Android Studio 4.0. Select Tools -> AVD Manager from the menu.
Note, if you are running Android Studio for the first time, you may have to create a new project first. You can start a new project, selecting the empty activity. Fill in the project details like the following
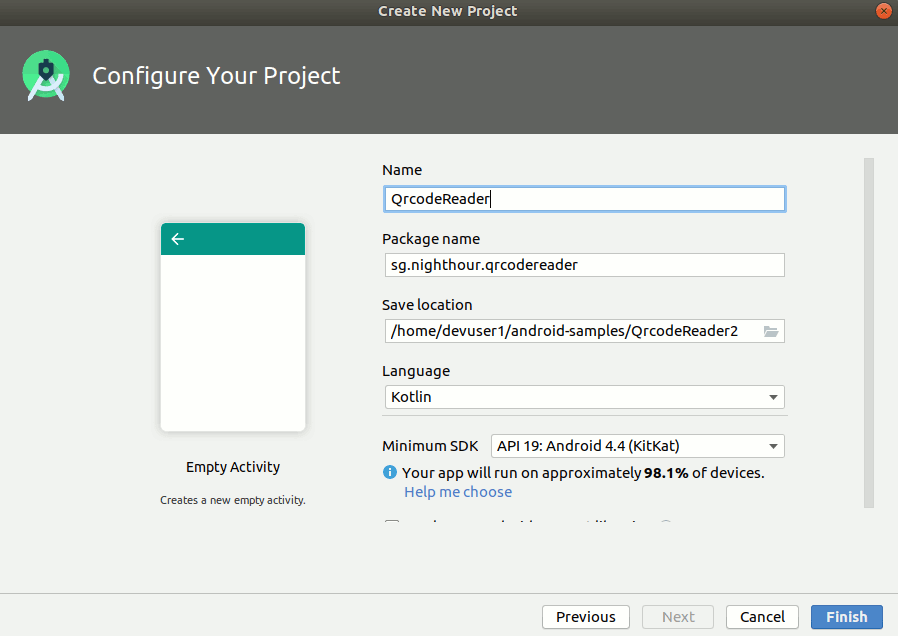
We gave our a project a name, QRCodeReader. The source are placed under the sg.nighthour.qrcodereader package. The langugae is kotlin and the minimum Android to be supported is 4.4 (Kitkat).
Start up the AVD Manager after the project is created.
Click on create virtual device.
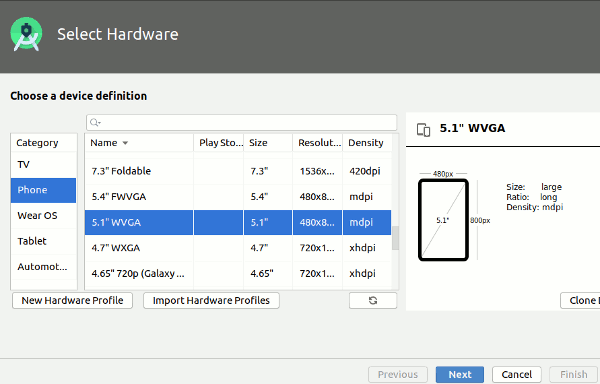
At the hardware selection, we chose 5.1" WVGA. Click Next.

For System image, we select Android 7.0 (Nougat). Click Next.
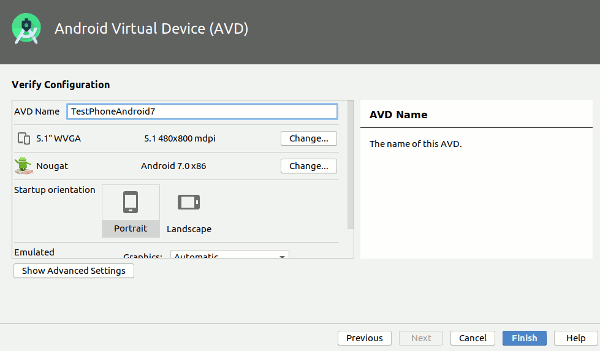
Give the Android Virtual Device a name, in this case, we set it to "TestphoneAndroid7". Click Finish and the device will be created. Note, Android Studio may download the system image if it is not available locally.
Implementation
The full source code for the application is available at the Github link at the end of the article.
Android Studio uses gradle for dependencies and to build the application. To include the zxing embedded android library, open up the build.gradle file for the Module:app in Android Studio. At the dependencies section, add in the following line.
You should see a notification in Android Studio asking you to do a sync for Gradle. Click on the "Sync" option and Gradle will download the zxing library.
The following shows the Android Manifest file. We added two <uses-permission> lines indicating the need for access to a hardware Camera. There is only a single activity (MainActivity) defined in the manifest.
<?xml version="1.0" encoding="utf-8"?>
<manifest xmlns:android="http://schemas.android.com/apk/res/android"
    package="sg.nighthour.qrcodereader">

    <uses-permission android:name="android.permission.CAMERA" />
    <uses-feature android:name="android.hardware.camera" />
    <application
        android:allowBackup="true"
        android:icon="@mipmap/ic_launcher"
        android:label="@string/app_name"
        android:roundIcon="@mipmap/ic_launcher_round"
        android:supportsRtl="true"
        android:theme="@style/AppTheme">
        <activity android:name=".MainActivity">
            <intent-filter>
                <action android:name="android.intent.action.MAIN" />
                <category android:name="android.intent.category.LAUNCHER" />
            </intent-filter>
        </activity>
    </application>

</manifest>
For android development, we will also need to create the layout for the user interface. As explained earlier, the main user interface will have only a textview and a button. This layout is defined in the res folder - >layout -> activity_main.xml.
Android Studio has a visual designer for creating layouts. But the layout can also be defined in xml. The following shows the content for activity_main.xml.
<?xml version="1.0" encoding="utf-8"?>
  <androidx.constraintlayout.widget.ConstraintLayout xmlns:android="http://schemas.android.com/apk/res/android"
      xmlns:app="http://schemas.android.com/apk/res-auto"
      xmlns:tools="http://schemas.android.com/tools"
      android:layout_width="match_parent"
      android:layout_height="match_parent"
      tools:context=".MainActivity">

      <TextView
          android:id="@+id/tvResult"
          android:layout_width="wrap_content"
          android:layout_height="wrap_content"
          android:text="Simple QR Reader"
          android:textSize="24dp"
          app:layout_constraintBottom_toBottomOf="parent"
          app:layout_constraintLeft_toLeftOf="parent"
          app:layout_constraintRight_toRightOf="parent"
          app:layout_constraintTop_toTopOf="parent" />

      <Button
          android:id="@+id/btnLaunch"
          android:layout_width="wrap_content"
          android:layout_height="wrap_content"
          android:layout_marginTop="16dp"
          android:text="Open URL in Browser"
          app:layout_constraintEnd_toEndOf="parent"
          app:layout_constraintHorizontal_bias="0.5"
          app:layout_constraintStart_toStartOf="parent"
          app:layout_constraintTop_toBottomOf="@+id/tvResult" />


  </androidx.constraintlayout.widget.ConstraintLayout>
There is a textview and a button defined. The id for the textview is tvResult and for the button is btnLaunch. In our MainActivity source code, we will refer to these views using their respective id. The textview will be used to display the content of the scanned QR code, and the button is used for launching an external browser using the scanned content as the website or URL.
Both the textview and the button are centered in the screen using constraint layout with chains and guidelines. This article will not go into details on how to do this, but it can be done graphically using the designer.
All our application and kotlin code are in the MainActivity.kt file. The following shows the code.
1 2 3 4 5 6 7 8 9 10 11 12 13 14 15 16 17 18 19 20 21 22 23 24 25 26 27 28 29 30 31 32 33 34 35 36 37 38 39 40 41 42 43 44 45 46 47 48 49 50 51 52 53 54 55 56 57 58 59 60 61 62 63 64 65 66 67 68 69 70 71 72 73 74 75 76 77 78 79 | package sg.nighthour.qrcodereader
import android.content.Intent
import android.net.Uri
import android.os.Bundle
import android.widget.Toast
import androidx.appcompat.app.AppCompatActivity
import com.google.zxing.integration.android.IntentIntegrator
import kotlinx.android.synthetic.main.activity_main.*
class MainActivity : AppCompatActivity() {
/* The request code for zxing IntentIntegrator */
val REQUEST_CODE = 1
override fun onCreate(savedInstanceState: Bundle?) {
super.onCreate(savedInstanceState)
setContentView(R.layout.activity_main)
/* Setup the onClick Listener for the launch browser button */
btnLaunch.setOnClickListener {
val urlstring = tvResult.text.toString()
if (urlstring.contentEquals("Simple QR Reader")){
Toast.makeText(this, "No url scanned", Toast.LENGTH_LONG).show()
}
else if(urlstring.startsWith("http://") || urlstring.startsWith("https://") )
{/* Check to make sure that the URL starts with http:// or https:// */
/* Launch an external browser using an implicit intent */
Intent(Intent.ACTION_VIEW).also {
it.setData(Uri.parse(urlstring))
startActivity(it)
}
}
else
{
Toast.makeText(this, "URL doesn't start with http:// or https://", Toast.LENGTH_LONG).show()
}
}
/* Create a Zxing IntentIntegrator and start the QR code scan */
val integrator = IntentIntegrator(this)
integrator.setRequestCode(REQUEST_CODE)
integrator.setOrientationLocked(false)
integrator.initiateScan()
}
/* Process the result from the zxing QR code scan */
override fun onActivityResult(requestCode: Int, resultCode: Int, data: Intent?) {
if(requestCode != REQUEST_CODE) {
super.onActivityResult(requestCode, resultCode, data)
return
}
val result = IntentIntegrator.parseActivityResult(resultCode, data)
if(result != null) {
if(result.getContents() == null) {
Toast.makeText(this, "Scan cancelled", Toast.LENGTH_LONG).show()
}
else
{ /* Update the textview with the scanned URL result */
tvResult.setText(result.getContents())
Toast.makeText(this, "Content: ${result.getContents()}",Toast.LENGTH_LONG ).show()
}
}
else
{
super.onActivityResult(requestCode, resultCode, data)
}
}
}
|
The onCreate() function is called when our Qr code reader application is started. It is the entry point for our android application. We set the user interface to be the layout defined in the earlier activity_main.xml.
Then we create the on click listener for the browser launch button. Whenever the button is clicked, the listener code will be executed. The scanned content is retrieve from the textview. We check that the scanned content is formatted properly, it starts with either https:// or http:// before launching a browser. For example, if the scanned QR content contains "www.nighthour.sg" and the button is clicked, the listener code will display a Toast notification saying that URL doesn't start with the right prefix.
If the prefix are correct, then an implicit intent is used to launch an external browser with the scanned URL. After the listener code has been defined, we can write a few lines of code to start the zxing scanning. We create a zxing IntentIntegrator, set some properties and start the QR code scan. The scanning and decoding of the QR code are all done by the zxing library.
The onActivityResult() function is called when the scan is done. Here the scanned content is obtained and the textview is set to display the content.
Testing the QR code Reader using Emulator
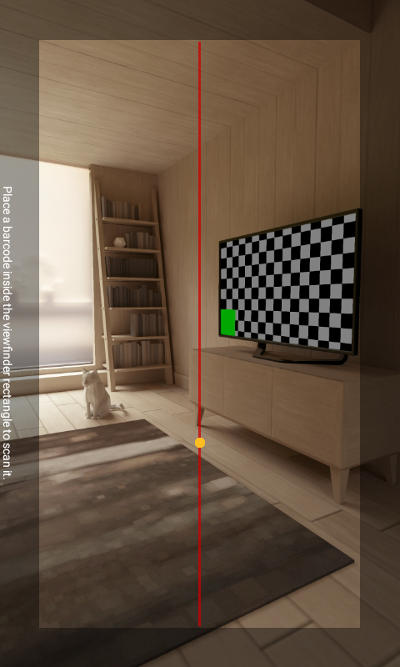
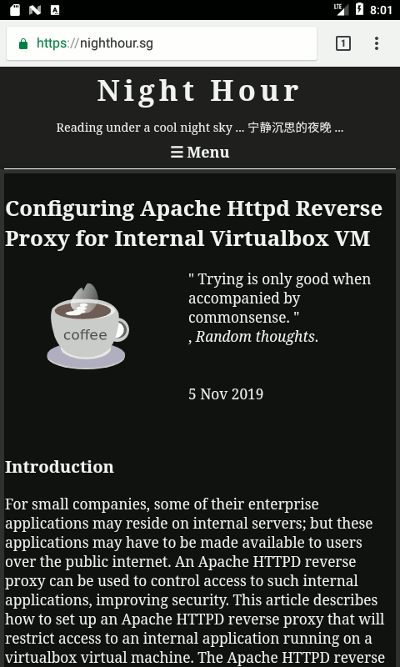
To test the application, we need to create some QR codes. There is a useful javascript qr code generator from davidshmjs that can be used to generate QR code online. The codepen link is available at https://codepen.io/davidshimjs/pen/NdBYrg
We can input some content like "https://nighthour.sg" and generate the corresponding QR code. We take a screenshot of the generated QR code and this image can later be configured in the Android emulator camera scene.
On Android Studio, there is a device selection in the menu. We set it to the virtual device "TestphoneAndroid7" that we have created earlier. When the application code is run, this emulator will be used.
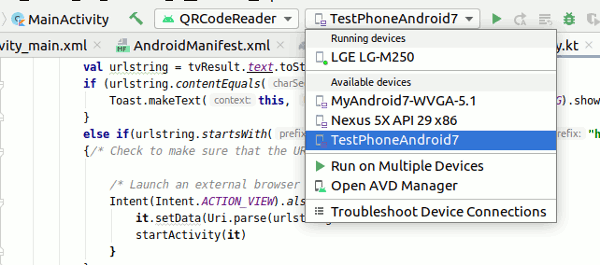
We can select "Run QRCodeReader" from the menu. The "TestphoneAndroid7" emulator will be started automatically.
After the emulator has started, our application will be launched. There will be a prompt requesting for camera permission. Click on Allow.

The camera will display a virtual scene that can be navigated by holding down Alt key with mouse drag or Alt key with the keys "WASDQE".
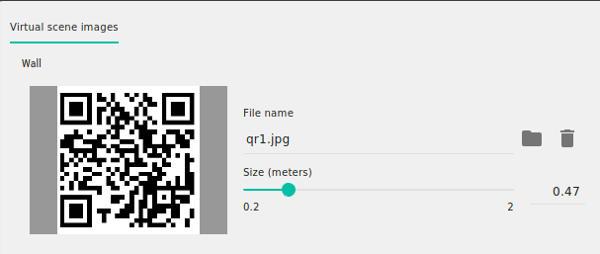
The QR code image that we created for testing can be added to the virtual camera scene. To do this, click on the "more" item on the emulator sidebar. The "more" item is the "...".
The extended controls will come up. Under camera, we can add an image to the wall and the table.
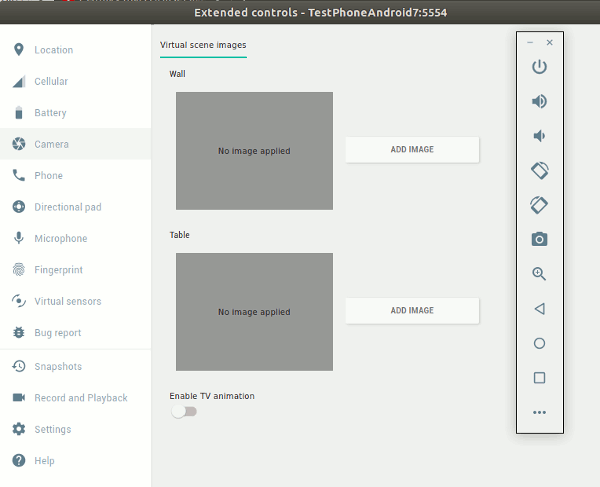
In this case, we add our QR code image into the wall. Notice there is a slider that can be used to size the image properly. We set it to around 0.47 m.
Close the extended controls. Let run our application again in the emulator. We need to navigate through camera scene into the kitchen where the wall with the QR code image is located.
Once the zxing library locked on the QR code and scanned it, it will call the onActivityResult() function. Our main layout will come up again, showing the content that was scanned.
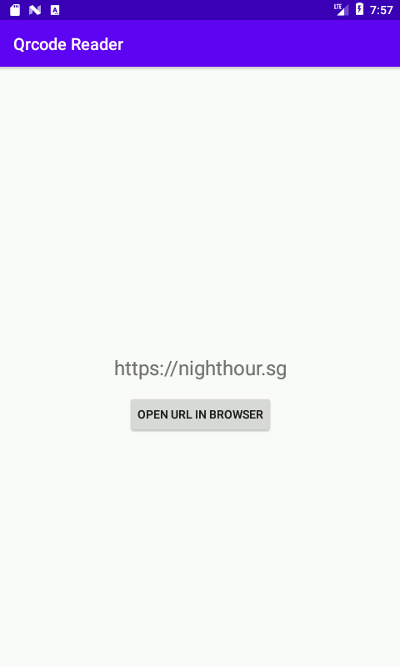
Click on the "Open URL in Browser" button and we can start a browser with scanned content as URL.
We can test with a few other generated QR code images, such as those containing content that doesn't start with https:// or http://. We can also navigate the camera to a location where there is no QR code and click on the Android back button, to make our QR reader still behaves properly where a scan is terminated.
We can also change the orientation of the emulator and make sure that QR code reader can still work. Once we are satisfied that the application is working properly, let's test it on a real phone using a SafeEntry QR code.
Testing the Qr code reader using hardware
The android developer site has instructions on how to run an app on hardware.
The key steps briefly are
- Install adb package on Ubuntu
- Enable Developer Options and USB Debugging on phone
- Connecting to the device
I will not go through all the details but will highlight some problems I encountered and how to solve them.
One particular problem is that Ubuntu 18.04 has its own adb binary located at /usr/bin/adb, this version is different from the one that came with Android Studio, located at the <SDK Location>/platform-tools/adb.
This can cause some versioning problems when runnning commands like
To resolve this. Use the adb from the platform-tools. You can set it as the default in your $PATH using a line like the following in .bashrc file.
Notice that location of the platform-tools is set as the first entry in $PATH. This will allow the adb from platform-tools to be used.
Another problem besides the adb versions is the accepting of the RSA security key in my LG smartphone. Somehow after connecting the LG phone to my ubuntu 18.04 system using developer options/usb debugging, there isn't a prompt for the RSA security key.
My Ubuntu computer is still unable to see my LG phone. After some googling, there are some answers on stackoverflow. The solution is to change the USB transfer mode on the LG phone to photos transfer instead of file transfer.
Once this is done, the prompt for accepting the RSA security key will come up. Accept the RSA key for the connected computer.
With these steps the device should appear in the Andriod Studio or when using the adb command. On Andriod Studio, select the LG phone to run the QR Code Reader application.
The QR Code Reader application should be built (debug version), installed on the connected LG phone and started up.
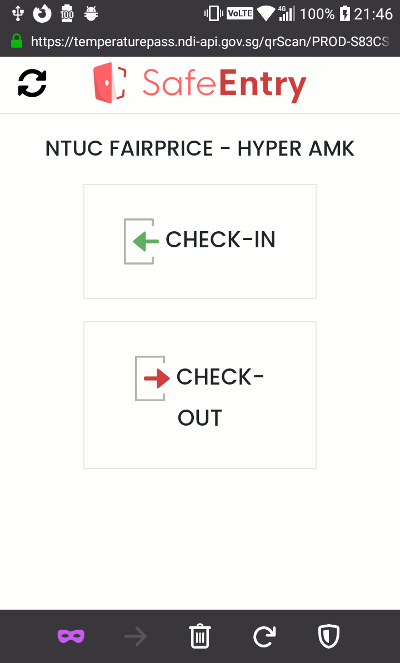
I have a photo of the AMK Hub NTUC SafeEntry QR Code which can be used to test our application. Scan the AMK Hub QR code using our application on the LG phone. You should get the following.
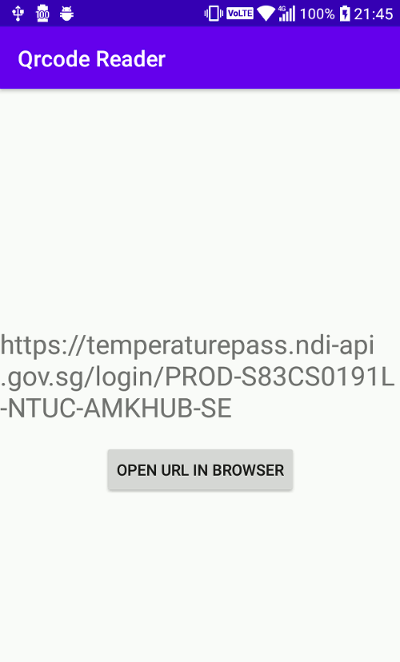
Click on the button to launch a browser and we should get the SafeEntry Check In and Check Out for AMK Hub NTUC. Our QR reader application is working properly.
Our Qr code reader application is installed in the LG phone. You can always start it by clicking on its icon. Take note that it is a debug version. To build a release version for production in Google Playstore, the apk file has to be digitally signed and go through a certain process to upload to Playstore.
Since we are building this app for ourselves and maybe a few friends or family members. The debug version is more than sufficient for our simple use.
Conclusion and Afterthought
Covid 19 has changed the way that society interacts and it will be quite a while before things return to normal. Although it is relatively easy to build simple android applications, particularly where libraries are available to do most of the work; the android platform is vast with many things to learn.
The SafeEntry system while useful for tracking movement of people in the fight against Covid 19, can still be improved further. For example, a SMS based solution can be developed for those who do not have a smartphone and are using a normal regular mobile phone. A web based solution for NRIC scanning can also be developed, this can cater to Singaporeans and people who do not have mobile phones.
The website application can work like this. It is launched by a web browser and uses the webcam on either a computer/laptop or a phone/tablet owned by the relevant owner of the place. The web application will simply scan the NRIC cards of visitors and do some image processing to get the details (barcode scanning) and registered an entry or exit time for each location.
Such an approach can be useful for small businesses or stores to cater for visitors or customers who don't carry mobile phones. It can also be more inclusive, making it as simple as having an NRIC or other identification cards for visitors. For owners of places, they do not need any barcode scanners, just a smartphone/tablet with webcam or a laptop/PC with webcam.
In our modern Singapore, there is still a digital divide. Government services have to strive to cater for all citizens even though it may not be easy.
Security is important though for any type of solutions, for the devices used for such processing and on the entire SafeEntry system as a whole. Visitor and citizen data have to be protected securely and used only by the authority for legitimate Covid 19 tracing.
This article has shown it is not too difficult to dabble with android and build simple application. In this case, this QR code Reader can turn out to be uesful in this time of Covid 19.
Useful References
- Zxing Embedded Android Library, The zxing library that can be used to do QR code scanning and processing.
- Android Developer Guide, The official developer website to learn about android development.
- AndroidDevs Youtube Channel, There are many short videos for learning kotlin and android development.
- SafeEntry, The main Singapore government Safeentry website, offering information about SafeEntry and how to get started using it.
- Html 5 QR Code Scanner, A QR Code scanner that uses html 5 and javascript. This can be integrated into other customized web applications.
- LazarSoft Javascript QRCode Detector, A javascript QR code detector/decoder that is ported from ZXing qrcode scanner. It is used by Minhaz's Html 5 QR code scanner for detecting and decoding QR code.
- Scanning QR Codes, A series of blog posts explaining how QR code scanning works.
- QR Code Tutorial, A useful tutorial explaining how to programme your own QR code encoder.
The full source code for the scripts are available at the following Github link.
https://github.com/ngchianglin/QRCodeReader
If you have any feedback, comments, corrections or suggestions to improve this article. You can reach me via the contact/feedback link at the bottom of the page.