Configuring Apache Httpd Reverse Proxy for Internal Virtualbox VM

Trying is only good when accompanied by commonsense.
, Random thoughts.
5 Nov 2019
Introduction
For small companies, some of their enterprise applications may reside on internal servers; but these applications may have to be made available to users over the public internet. An Apache HTTPD reverse proxy can be used to control access to such internal applications, improving security. This article describes how to set up an Apache HTTPD reverse proxy that will restrict access to an internal application running on a virtualbox virtual machine. The Apache HTTPD reverse proxy itself will be set up on a Ubuntu VM (virtual machine) in the same virtualbox host.
The Virtualbox virtual machines should be configured such that only the Apache HTTPD reverse proxy has access to the outside internet. The enterprise application VM (virtual machine) will be on an internal host-only network and is not directly exposed to the internet. For simplicity, the Apache proxy VM will also serve as a NAT (Network Address Translation) router/gateway for the internal enterprise VM. This allows the enterprise VM to retrieve patches from the internet.
The enterprise VM is a windows server and local windows firewall should be enabled to allow only authorized incoming and outgoing connections. The Apache proxy VM will have iptables firewall rules enabled. The virtualbox host machine itself should be secured with suitable local firewall rules. The small company network is connected to the internet through a router/gateway physical device.
Illustration of the VirtualBox and Network Set up
The following diagram shows how the virtual box server, the virtual machines and the network look like.

The Apache HTTPD reverse proxy VM is connected to both the internal host-only network (no access to internet) as well as to an interface that has access to the small company network. The company network is connected to the public internet through a gateway device. There is a firewall that protects the company network. This firewall may be integrated as part of the gateway device.
The gateway device has a public internet IP and will do port forwarding for 443 (TLS) to the Apache Proxy VM. The Apache HTTPD Reverse Proxy itself will then proxy the request to the enterprise application running on the enterprise VM.
To control access to the internal enterprise application, the Apache HTTPD reverse proxy enables basic authentication so that only authorized company users can access the enterprise application. The enterprise application itself has its own login and authentication mechanism.
Some Assumptions and PreRequisites
The following lists some of the assumptions and prerequisites. Other additional assumptions and requirements will be stated when required in the article.
- The virtualbox host server has been setup and installed with the latest version of virtualbox. At the time of writing, the latest virtualbox is 6.0.14.
- The virtualbox host server should be patched up with all the latest patches. It should also be hardened using relevant security baselines like those from Center for Internet Security.
- Local firewall should be enabled for the virtualbox host server and only required outgoing and incoming connections are allowed. In other words, all non-relevant inbound and outbound connections should be blocked.
- The virtualbox host server is physically secured in a location that only authorized personnel can access.
- The enterprise application VM has been set up and updated with all the latest patches. It is configured with a single interface on the host-only network that has no internet access. The enterprise application VM has also been hardened with relevant security benchmarks like those from Center for Internet Security. In addition, the enterprise application itself should also be hardened and secured based on the vendor instructions and security best practices.
- Strong login credentials are required for logging into both the virtualbox host server and the enterprise application vm.
- The small company network has been properly secured and segmented according to the company requirements.
- There should be a firewall device protecting the company internal network. The firewall must be enabled with the proper rules to block unnecessary incoming connections from the public internet. The company may choose to block unnecessary outgoing connections as well, according to its needs. The firewall may be a part of the gateway device.
- The gateway device should have a public IP address assigned to its internet facing network (WAN) interface. Port forwarding of port 443 should be enabled to the internal company network IP address of the Apache Proxy VM.
- All the network devices such as the firewall and gateway should be updated with the latest patches or firmwares and located in secure locations that only authorized personnel can access. All network devices must be secured with strong login credentials. No default passwords must be in use. Remote administrative access from the public internet must be disabled.
- There is a company process to apply and test patches, firmware updates on a regular basis for the entire IT infrastruction setup. Critical security updates must applied in a timely manner outside of the usual patching/update cycle.
- Additional protection mechanism like regular monitoring of firewall/gateway logs, enterprise application logs, windows security events, regular verification and reapplication of hardening baselines/benchmarks etc... should be implemented. Anti malware and antivirus protection should be enabled for the relevant systems and security signatures must be kept updated.
- It is assumed that proper backups of the existing virtual machines, configurations, important data on the virtual machine host server and any other important application or company data have been done and these are stored securely in a safe location.
- The company should have a regular backup mechanism/process that will backup all important data including virtual machines at a regular interval. All backups are stored securely in a safe location.
- There should be a regular process to test that all important data including virtual machines, enterprise application data etc... can be restored successfully from backups.
The rest of the article focuses on setting up Ubuntu 18.04 LTS with a Apache HTTPD reverse proxy, that will restrict access to the enterprise application VM. It does not cover in depth hardening of the Ubuntu 18.04 LTS or Apache HTTPD. Refer to the relevant benchmarks from Center for Internet Security to harden the Ubuntu and Apache HTTPD.
Setting a New Virtual Machine
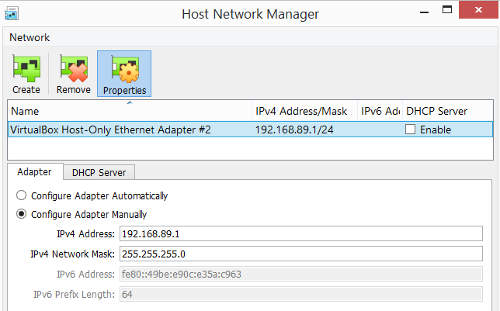
Before we start, make sure that all the proper backups have been done. It is assumed that the virtualbox host-only network (192.168.89.0/24) has already been configured and the enterprise application VM is assigned ip address 192.168.89.30. DHCP (Dynamic Host Configuration Protocol) is not enabled for the host-only network.
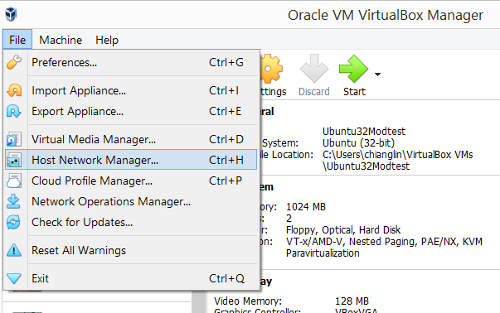
To view the virtualbox host networks. Start up virtualbox. Select File -> Host Network Manager.
The host only network 192.168.89.0/24 should be configured like the one shown below.
From the virtualbox console, select Machine ->New.

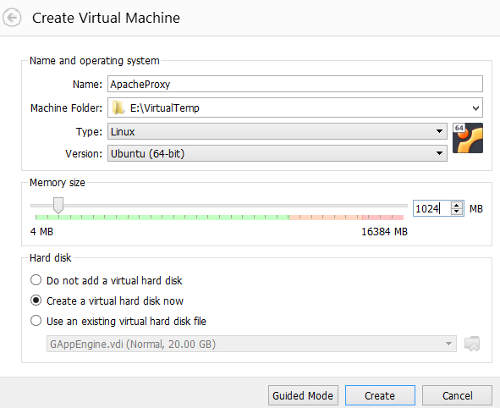
The create new machine window will come up. In the name field, fill in "Apache Proxy". Under Machine Folder, select a suitable location where the virtual machine image will be created and stored. The type should be "Linux" and version is "Ubuntu (64-bit)". Allocate it at least 1024MB of RAM. Choose the option, "Create the virtual hard disk now". Click on "Create".
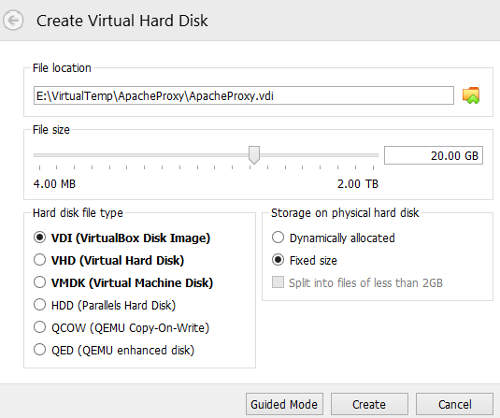
At the Create Virtual Hard Disk window, set the file size to be at least 20GB. Select the "fixed size" option. Click on "Create".
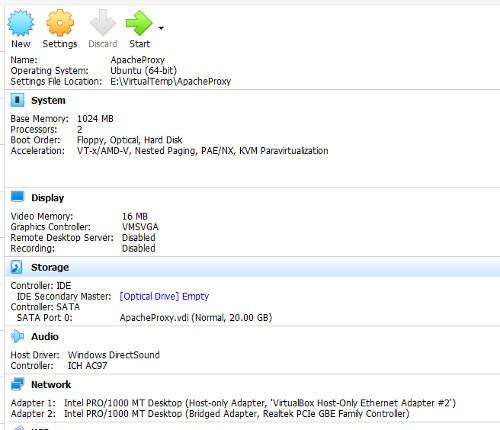
Once the disk image is created, a new virtual machine "Apache Proxy" should appear in the virtualbox console.

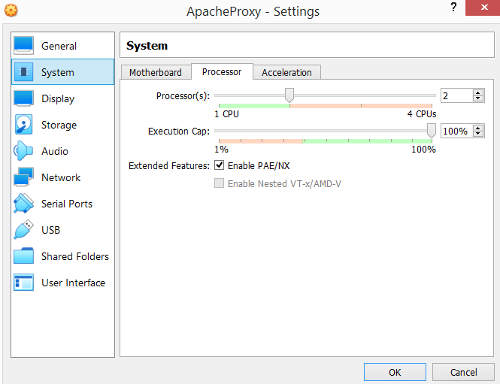
Click on the settings option for the Apache Proxy VM. Select the "Systems" on the left of the settings window. Select the "Processor" tab. Set the number of processors to 2. Checked the "Enable PAE/NX" option. Click "Ok".
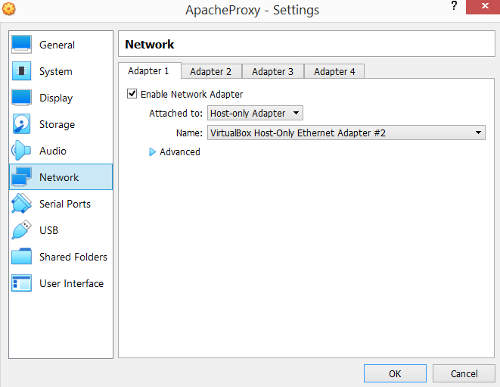
Click on the settings option for the Apache Proxy VM again. Select "Network" on the left of the settings window. Select the Adapter 1 tab. The "Enable Network Adapter" option should be checked. Under the Attached To field, select "Host-Only Adapter". The name of the adapter should match the one in the Host Network Manager earlier when we view the network (192.168.89.0/24). In this case, the name is "VirtualBox Host-Only Ethernet Adapter #2".
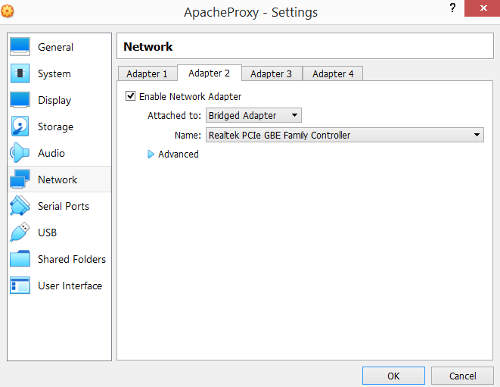
Click on the Adapter 2 tab. Checked the "Enabled Network Adapter" option. In the Attached To field , select "Bridged Adapter". The name of the adapter should correspond to the network interface card on the virtualbox host server. If the host server has multipe network interface cards, this should be the one that is connected to the small company network. Click "Ok".
The Apache Proxy VM configuration is mostly done. For more information on virtualbox configuratin, refer to the VirtualBox User Manual.
Installing Ubuntu Server 18.04 LTS
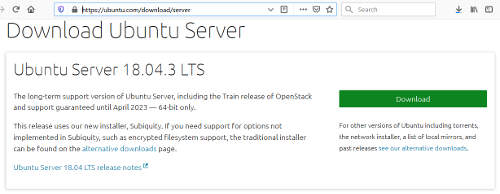
Download the latest ubuntu server 18.04 LTS iso file from https://ubuntu.com on your windows workstation. At the time of writing the latest Ubuntu Server LTS version is 18.04.3.
Verify the integrity of the iso file after it has been downloaded. On a windows workstation such as windows 8 or 10, the certutil utility is available for doing checksums. The ubuntu server 18.04.3 iso should have the following SHA256 checksum.
On the windows workstation, click on
At the powershell prompt type
Note you need to replace the location for the iso file in the above command to where you have saved the downloaded ubuntu iso file. The sha256 checksum generated should match the one stated earlier.
Take note that you should surfing the internet on the virtual server host machine. This is to avoid accessing malicious websites or files accidentally that can have serious security consequences. All web surfing, such as visiting ubuntu website and downloading the ubuntu iso should be done on a regular workstation with antivirus/malware protection. The downloaded file can then be transfered over to the server.
Setting the Apache Proxy VM to boot with the ISO
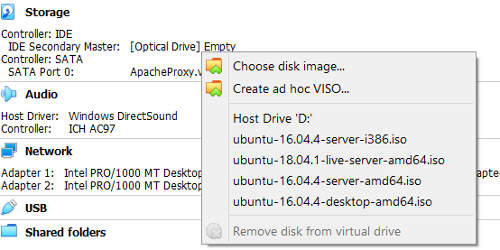
Transfer the ubuntu server iso file to the VirtualBox host server. Start up the virtualbox console and select the Apache Proxy VM. On the right side, the settings of the Apache Proxy VM should be shown. There should be a "[Optical Drive] Empty" option under storage category. Click on this "[Optical Drive] Empty" option.
Select "Choose Disk Image" when the context menu comes up.
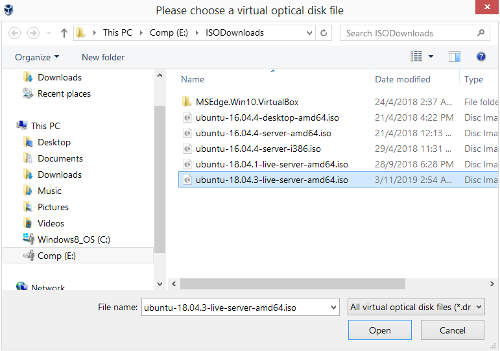
Select the Ubuntu Server 18.04.3 iso file when the file chooser comes up. Click "Open".
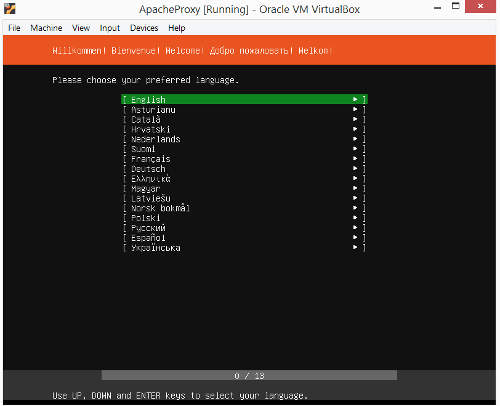
The "[Optical Drive]" field should now display the ubuntu server iso file instead of being empty. Click on "Start" at the top menu to boot up the Apache Proxy VM. Upon booting up, the console for the Apache Proxy VM should show the ubuntu server installation screen. It should be prompting to choose a language. The default is "English". Just press "Enter" to continue.
The next screen is the keyboard selection. Leave it as the default and press "Enter" to continue.
The network configuration comes up next. There will be two network interface cards. The first one is for the host-only network (without internet access), the second is for the company network. For now, we continue without configuring the network. Leave the settings as default and press "Enter" to continue.
Continue to press "Enter" for the next few screens, Configure Proxy, Configure Ubuntu Archive Mirror, FileSystem Setup, FileSystem Setup (choose disk). Leave the settings for these as defaults.
Take note that the default disk partition is different from the CIS (Center for Internet Security) hardening recommendation. The CIS benchmark may specify that separate disk partitions be used for different filesystem mount points. For example, /tmp should be on its own disk partition.
To simplify the setup, this article doesn't go into details on how to partition up the virtual hard disk. The Apache Proxy VM will have a narrow scope of usage/role. Only running apache httpd as a reverse proxy and not hosting any web application scripts or data. The VM will also serve as a router cum firewall for the internal host-only network. The router/firewall role is to allow the enterprise VM to retrieve windows patches/updates. Apart from these 2 roles, the linux system is not used for any other purpose. This reduces the security risk associated with having a single disk partition.
That said, if time and effort permits, it is good security practice to follow the CIS hardening guide and provide seperate disk partitions for some of the filesystem mount points. This will enable filesystems to be mounted with different and stricter permission settings. For details, refer to the CIS hardening benchmark for Ubuntu 18.04 LTS.
At the FileSystem Summary screen showing the disk partition, press "Enter".
A confirmation box, "Confirm destructive action" will pop up. Use the down arrow key to select the "Continue" option. Press "Enter".
At the profile Setup page. Fill in the details for the linux user account. Enter the name of the user. In this case, we use "Mr Apache Administrator". Enter the server name, "apacheproxy". The "pick a username" is referring to the login id. In this field, we type the userid "apxyuser1". Enter a long complex hard to guess password that is at least 8 characters long. The password should contain alphanumeric characters, both upper and lower case, and special characters.
Note, this is only a temporary password. We will change it to an even longer and more complex one (at least 20 characters) later. To make password management easier, use a password manager like Bruce Schneier Password Safe.
Select "Done" and press "Enter" to continue.
Next is the SSh Setup screen. Checked the "Install OpenSSH server" option by using the enter key. Select "Done" and press "Enter" to continue.
Ubuntu will start installing. Once installation is completed. A reboot now option will appear. Click "Enter" to reboot.
There will be another prompt to remove the installation medium. Simply press "Enter" to continue.

When ubuntu boots up, you should see a login prompt. You can log in to the system by typing the userid "apxyuser1" at the login prompt and then the password created for the account earlier.
For more detailed information on how to install Ubuntu, refer to the official Ubuntu Server LTS Installation Guide.
Initial Configuration of Ubuntu
In this section, we will start configuring the Ubuntu 18.04 LTS. The article will not go into details on hardening the system. Download the Center for Internet Security guide for Ubuntu 18.04 LTS and follow the benchmark to do a full hardening.
Login to the Ubuntu using the user "apxyuser1" and its password. One of the first thing to do after logging in is to set the correct timezone.
From the screenshot above, it can be seen that the timezone is UTC. We need to set to Asia/Singapore. Type the following command and press "Enter" to change to root user.
Enter the password for apxyuser1 when prompted. The following screenshot shows this.

Security and adminstrative best practices often state that one should not work on a linux system as root user. In this case, our system is newly setup and there is little risk of issue even if a root user mistake bring down the newly installed ubuntu server. For a live production system, follow the best security practice and evoke the required root privilege using the sudo command.
For the rest of the commands, it is assumed that we are using the root user account. Type the following command and press enter to change the timezone.
Let's change the UMASK of the system from the default 022 to 077. This make the default permissions of the files and directories created by the root user more secure. We will use the nano text editor to edit the /etc/login.defs file. Type and enter the following command.
The nano text editor is easier text editor for those new to linux. You can navigate a file using the arrow keys or page up/page down keys. At the bottom of the editor, you can see a menu of options like "^G Get Help", "^O Write Out", "^X Exit" etc... The "^" sign means control key and the character next to it is the keypress that together with the control key will evoke the option. For example, to exit (^X Exit), press the control key and the "X" key together.
In the /etc/login.defs file, lines that start with a "#" are comments. Scroll down the file using the Page Down key or the down arrow key. Look for the UMASK setting.
Move the cursor to the setting using the right arrow key. Use backspace to delete the 022 and type 077 as replacement.

Press Ctrl key and the X key together to exit. When prompted to "Save modified buffer", enter Y.
Press enter when the file name to write prompt comes up.

nano will exit and you will get back to the command prompt. The new UMASK setting 077 will only take effect after a reboot or a log out and log in. To reboot, type the following and press "enter".
After the server has come up, login again and change to the root user using "sudo su -". We will configure the networking for the Ubuntu server. As root, type the following and press "enter". In the linux command prompt, commands that have been typed in only execute after the "enter" key is pressed.
There should be two network interfaces, enp0s3 and enp0s8.
enp0s3 should be the one for the host-only adapter that we created earlier. We can verify by comparing its MAC address with the adapter setting for Apache Proxy VM in virtualbox. From the screenshot above, the line "ether 08:00:27:94:5f:55" under enp0s3 is MAC address for enp0s3.
On the virtualbox console, Select the Apache Proxy VM -> Settings -> Select Network -> Under the Adapter 1 Tab -> Click on the Advance option.
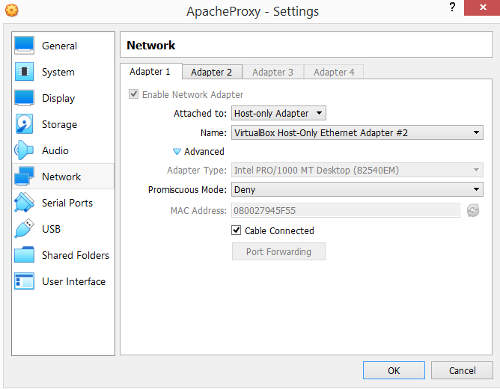
It can be seen that the MAC address "080027945F55" matches the one for enp0s3. Note, the colon in the linux mac address value is a seperator that can be ignored.
We will assign the IP address 192.168.89.50 in the host-only network to the Apache Proxy VM. The network settings are in the file /etc/netplan/50-cloud-init.yaml. Edit this file using nano editor.
Modify the existing network setting and enter the following
Notice the indentation in the text. These are not entered using tab key. Use space bar for the indentations. 4 spaces per indent.
Press "Ctrl X" to exit. Enter "Y" when prompted to "Saved Modified Buffer". At the "File Name to Write" prompt, leave it as the default " /etc/netplan/50-cloud-init.yaml" and press "enter".
Type the following command to apply the setting.
Run ifconfig again and this time you see enp0s3 being assigned the IP address 192.168.89.50.
Setting up Putty Access
By now, you will have noticed that the ubuntu console is not a convenient interface. To make life easier, we can use the popular putty client and ssh into the linux server. Putty client supports cut and paste etc... The latest version of Putty can be downloaded from https://www.chiark.greenend.org.uk/~sgtatham/putty/latest.html
From a workstation download the 64 bit windows version of putty.zip. The SHA256 checksum for the zip should be
Use the certutil commmand to verify that the downloaded putty.zip has got the correct SHA256 checksum.
Transfer the putty.zip to the virtualbox server. Unzip the putty.zip at a directory where you want to store the putty binaries. Double click on the putty.exe to start up putty client.
At the host field, enter the ip address "192.168.89.50" that is configured in the ubuntu server. Enter the name "Apache Proxy" on the "Saved Sessions" field.
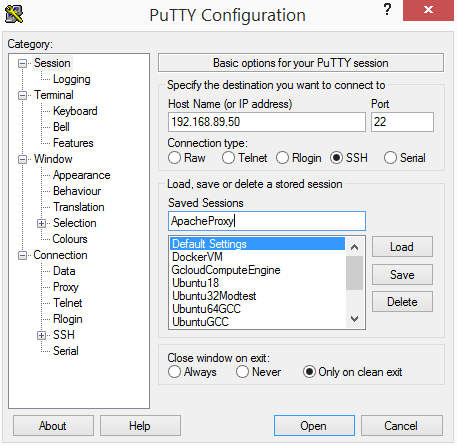
Click on "save" to save this session so that we don't have to re-type the ip address each time. Click on "Open". You should get a prompt about the server host key. This prompt comes up the first time that putty connects to a server.
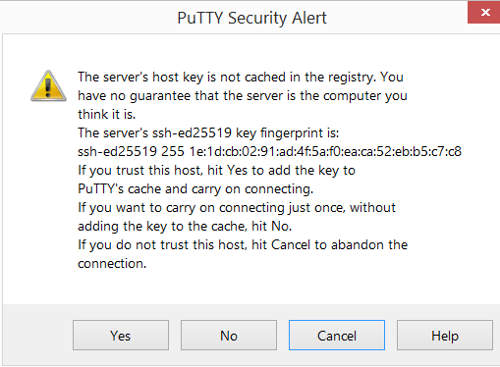
Click "Yes" to accept the server host key. The login prompt should come up.
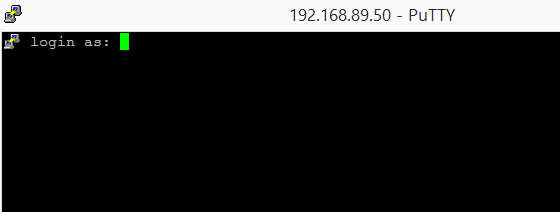
Log in using apxyuser1 and its password. For subsequent connections, you can start up putty and click on the "Apache Proxy" session to start a new connection.
Restricting SSHD to host-only IP
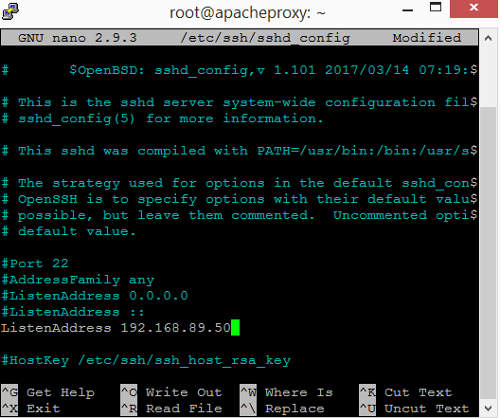
After you have logged in through putty, change to the root user using the command "sudo su -". We will configure sshd to listen only on the IP address 192.168.89.50. This is important to prevent the Apache Proxy VM from being accessed by other computers on the company network. Edit /etc/ssh/sshd_config using nano text editor.
Lines beginning with "#" are comments. Add a ListenAddress setting specifying IP address 192.168.89.50.
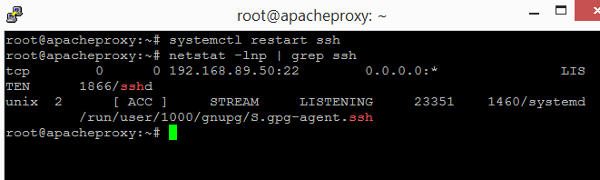
Exit nano and save the changes. Restart the sshd using the following command.
To check that sshd is now listening on the host-only IP address 192.168.89.50, type the following and press enter.
You see the line "192.168.89.50:22" like in the following screenshot.
Refer to the CIS Ubuntu 18.04 benchmark for further hardenings of the SSHD.
Enable Internet Access
We will now enable internet access for the Apache Proxy VM. We assume that the office/company network IP address 10.1.0.175 is assigned for this VM. The gateway of the company is at 10.1.0.1 and the subnet mask is 255.255.0.0 (/16).
Login to Apache Proxy VM using putty client and change to the root user. The second interface enp0s8 on the ubuntu which is connected to the office/company network should be assigned the 10.1.0.175 IP address. Edit the file /etc/netplan/50-cloud-init.yaml using nano.
Add the entries for enp0s8 as follows. Note that it is important that the indentation uses space and keep it at 4 spaces per indent. We are using google public dns servers (8.8.8.8, 8.8.4.4) for name resolution.

Apply the settings using the following command.
Ping a website like www.google.com to check that we got internet access.
Update Ubuntu Kernel and Patches
Let's update the Ubuntu 18.04 LTS to the latest kernel and patches. Issue the following command to check for the latest packages.
The following screenshot shows this.
When the command completes, run the following to fetch the updated packages and upgrade Ubuntu 18.04 to the latest kernel and patches.
You will get a confirmation prompt saying which packages will be updated, the disk space usage etc... Enter "Y" to confirm.
After the latest kernel and patches have been installed. Run the following command to clean up.
The following screenshot shows this.

Reboot the server for all the updates to be effective.
The Ubuntu 18.04 LTS server should be upgraded regularly. Run the steps in this section on a regular basis. These steps should also be performed when Canonical releases any critical security patches.
The Ubuntu 18.04 LTS will be supported until April 2023, after which Canonical (company behind ubuntu), may no longer release any new updates. A new version of Ubuntu will then have to be installed by then.
Refer to the following Ubuntu security notices, for the latest security notices for Ubuntu. You can also subscribe to the ubuntu-security-announce mailing list to get notices about security updates.
Installing VirtualBox Guest Addition
After the ubuntu server has booted up, login again using putty client. Change to the root user using "sudo su -". We shall now install the VirtualBox Guest Addition. The Guest Addition provides enhanced functionalities like the ability to synchronized the time with the virtualbox host server.
Go to the Virtualbox console for the Apache Proxy VM. At the top menu, select Devices ->Insert Guest Additions CD Image.
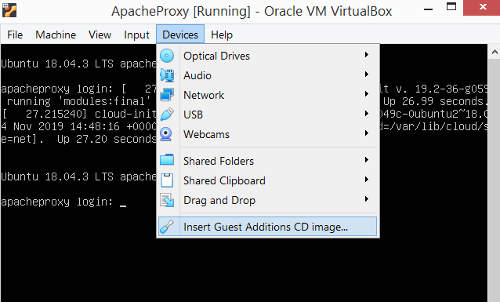
At the putty client, mount the cdrom using the following command.
The following screenshot shows this

Change to the /media directory using the following command.
Issue the following command to install build tools required for compiling software.
The following screenshot shows this.
Enter "Y" to install the tools. Enter the following command to compile and install the guest addition.
The following illustrates this.
Remove the build tools. For security reason, the ubuntu server should not have build tools present. Issue the following command.
Enter "Y" when prompted for confirmation.

Reboot the server for the guest addition to take effect
Whether virtualbox software is updated on the virtualbox host server, the guest addition in each of the virtual machines should be updated too. To update the guest addition, repeat the steps in the earlier section on update ubuntu kernel and patches. Then repeat the steps here to update to a newer guest addition.
Setting up IPtables firewall and NAT
In this section, we will set up the Apache Proxy VM running Ubuntu 18.04 LTS as a router with NAT(Network Address Translation) for the host-only network. Iptables firewall will be enabled as well. Take note that good security practice dictate that we should be using a dedicated machine or virtual machine for this function of router/NAT. In this article, we combine the router/NAT role with the apache httpd proxy role for simplicity.
It is actually possible to simply just install another linux VM and follow the instructions in the article, to set up a dedicated router/NAT. The recommended approach is to use a dedicated linux VM for router/NAT. If a dedicated linux router/NAT is used, the Apache Proxy VM should be created with only a single host-only adapter. It should not be able to access the internet directly but only through the linux router/NAT VM. In the company network, the physical gateway device should be doing port forwarding (port 443) to the linux router/NAT VM instead of the Apache Proxy VM.
Back to our setup. Login to Apache Proxy using the putty client. Change to the root user (sudo su -).
Edit the /etc/sysctl.conf using nano.
Scroll to the bottom of the file and add in these lines.
net.ipv4.conf.all.accept_source_route = 0
net.ipv4.conf.default.accept_source_route = 0
net.ipv4.conf.all.accept_redirects = 0
net.ipv4.conf.default.accept_redirects = 0
net.ipv4.conf.all.secure_redirects = 0
net.ipv4.conf.default.secure_redirects = 0
net.ipv4.conf.all.log_martians = 1
net.ipv4.conf.default.log_martians = 1
net.ipv4.icmp_echo_ignore_broadcasts = 1
net.ipv4.icmp_ignore_bogus_error_responses = 1
net.ipv4.conf.all.rp_filter = 1
net.ipv4.conf.default.rp_filter = 1
net.ipv4.tcp_syncookies = 1
net.ipv4.tcp_timestamps = 1
net.netfilter.nf_conntrack_tcp_loose = 0
net.netfilter.nf_conntrack_helper = 0
net.ipv4.ip_forward = 1
The following screenshot shows this.
Exit nano and save the changes.
The sysctl.conf controls the kernel parameters that are set when the system boots. The settings above are for the kernel network parameters. One of the kernel parameter, nf_conntrack_tcp_loose, seems to be difficult to set in Ubuntu 18.04 LTS. We need to create another file that will be run at start up.
Enter the following content in the file.
#!/bin/sh -e

/sbin/sysctl -w net/netfilter/nf_conntrack_tcp_loose=0

exit 0
Exit nano and save the changes. Change the permission of the file with the following command.
rc.local is a script that will run when Ubuntu starts up. It will set the kernel parameter nf_conntrack_tcp_loose to 0. We need this because the sysctl.conf doesn't seem to set this parameter properly on Ubuntu 18.04 LTS.
Create a new file using nano for our iptables firewall rules.
Enter the following content. If your setup is using different IP addressing, you need to edit the IP addresses accordingly. In the content, lines starting with "#" are comments.
# Configure Network address translation to masquerade for the internal host-only network 192.168.89.0/24.
# If your network addressing is different, change it accordingly.
iptables -t nat -F POSTROUTING
iptables -t nat -A POSTROUTING -s 192.168.89.0/24 -o enp0s8 -j MASQUERADE

# Configure the incoming connections that are allowed. Port 443 traffic is allowed.
# SSH port 22 is restricted to the virtualbox host server.
# Other established connections are allowed, for example, the Apache Proxy VM starting
# a connection to get updates from Canonical. ICMP requests are rate limited.
iptables -F INPUT
iptables -A INPUT -i lo -j ACCEPT
iptables -A INPUT -m conntrack --ctstate ESTABLISHED -j ACCEPT
iptables -A INPUT -p icmp --icmp-type 8 -m limit --limit 10/m  -j ACCEPT
iptables -A INPUT -p icmp --icmp-type 11 -m limit --limit 10/m  -j ACCEPT
iptables -A INPUT -p icmp --icmp-type 3 -m limit --limit 10/m  -j ACCEPT
# 192.168.89.1 is the virtualbox host server IP address for the host-only network.
# Change this ip address if you have a different host-only ip address for the virtualbox host server.
iptables -A INPUT -p tcp  -s 192.168.89.1 --dport 22 -j ACCEPT
# If this is a dedicated router, delete the following line as port 443 should not be allowed.
iptables -A INPUT -p tcp --dport 443 -j ACCEPT
iptables -A INPUT -m limit --limit 10/m --limit-burst 15 -j LOG --log-prefix "firewall: INCOMING DROP: "
iptables -A INPUT -j DROP

# Configure the forwarding that is allowed.
iptables -F FORWARD
# Allow forwarding for the host-only network 192.168.89.0/24. Change this network ip if you are
# using a different network IP addressing.
iptables -A FORWARD -p tcp -s 192.168.89.0/24  -j ACCEPT
iptables -A FORWARD -p udp -s 192.168.89.0/24  -j ACCEPT
iptables -A FORWARD -p icmp --icmp-type 8 -m limit --limit 10/m  -j ACCEPT
iptables -A FORWARD -p icmp --icmp-type 11 -m limit --limit 10/m  -j ACCEPT
iptables -A FORWARD -p icmp --icmp-type 3 -m limit --limit 10/m  -j ACCEPT
iptables -A FORWARD -m conntrack --ctstate ESTABLISHED -j ACCEPT
iptables -A FORWARD -m limit --limit 10/m --limit-burst 15 -j LOG --log-prefix "firewall: FORWARD DROP:"
iptables -A FORWARD -j DROP

# log outgoing connection from Apache Proxy VM
iptables -F OUTPUT
iptables -A OUTPUT -m limit --limit 10/m --limit-burst 15 -j LOG --log-prefix "firewall: OUTGOING CONNECTION: "
Exit nano and save the changes. Apply the rules using the following command.
There should not be any error messages. To check if the rules are applied, use the following command.
You should be able to see the following.
Check the rules for the other tables.
The following should be shown.
You should be able to match each of the lines shown to the rules in the firewall.sh file created earlier. To make the firewall and NAT rules persistent between reboots, we need the iptables-persistent package. Install it using the following command. When prompted to install, enter "Y".
When prompted for the location to save the firewall rules. Leave it as default and press "enter".
As part of the iptables-persistent package installation, the current firewall rules are saved. However, if we want to be really sure; we can manually save it again. Save the firewall rules using the following command.
Logging is enabled in the firewall rules. By default the logs will go the system syslog. This can clutter up the syslog. We need to separate out the firewall logging to another log file. Create a file /etc/rsyslog.d/20-iptables.conf using nano.
Enter the following into the file.
:msg,contains,"firewall:" /var/log/iptables.log
& stop
The following screenshot shows this.
Exit nano and save the changes. Now that we got a separate log file for iptables firewall, we need to ensure that this file doesn't keep growing until it takes up all the disk space. There is a need to rotate the log file. Create the following file with nano.
Enter the following content.
/var/log/iptables.log
{
	rotate 4
	weekly
	missingok
	notifempty
	compress
	delaycompress
	sharedscripts
	postrotate
		invoke-rc.d rsyslog rotate >/dev/null 2>&1 || true
	endscript
}
Exit nano and save the changes. Let's do another reboot for all the settings to take effect.
To allow the enterprise application VM to access the internet through the Apache Proxy VM. It has to be configured with the Apache Proxy VM as its gateway. Assuming the enterprise application vm is a windows server and is assigned the host-only IP address 192.168.89.30; the following shows a sample of the network configuration.
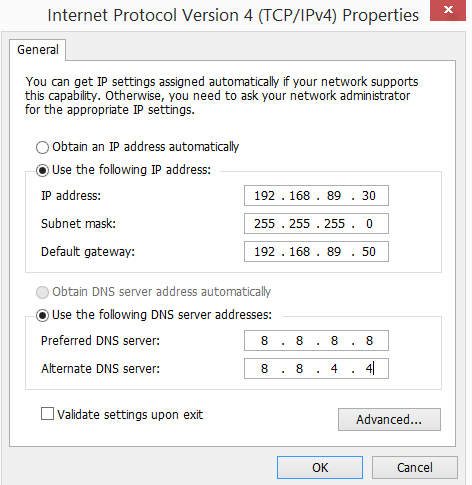
The enterprise vm is configured to use the public google dns servers 8.8.8.8 and 8.8.4.4 for dns resolution. To test the Apache Proxy VM router/NAT configuration. You can login to the enterprise application vm and ping www.google.com from the command line. You should be able to get replies.
To further harden and secure the Apache Proxy VM, refer to the CIS benchmark for Ubuntu 18.04 LTS.
Configure Apache Httpd as Reverse Proxy
In this section, we will install and set up Apache as a reverse proxy for the internal enterprise application. We will not cover details on hardening apache httpd. Refer to the Center for Internet Security Apache httpd benchmark on instructions to harden the Apache httpd.
Login to the Apache Proxy VM using putty client. Change to the root user. If you forgotten how to do this, check the earlier sections. Someone new to linux who has followed through the earlier sections will have been much more familiar with linux command line by now. This section, we will be going slightly faster.
Install the latest version of Apache Httpd using the following two commands.
apt-get install apache2
The first updates the packages list, getting the latest versions. The second command installs the apache2 package. Running the 2 commands, one after the other ensures that the latest apache2 package will be installed. Enter "Y" when prompted for confirmation.
Notice the line asking the user to run "apt autoremove" to remove some unneeded packages ? Let's run "apt autoremove" after apache2 has been installed.
Enter "Y" when prompted.
Disable some of the apache modules that we do not need. Run the following commands one by one.
a2dismod status
a2dismod autoindex
a2dismod env
When disabling some of the modules, you may be prompted to type a phrase. Type the phrase and press "Enter".
Edit /etc/apache2/apache2.conf using nano.
Look for the following
<Directory /usr/share>
       AllowOverride None
       Require all granted
</Directory>
Change the above to the following.
#<Directory /usr/share>
#       AllowOverride None
#       Require all granted
#</Directory>
This commented out /usr/share and hence access is prevented. For our use case here, we do not need /usr/share to be accessible by apache httpd. Look for the following section of text.
<Directory /var/www>
        Options Indexes FollowSymLinks
        AllowOverride None
        Require all granted
</Directory>
Change the "/var/www" to "/var/www/empty". Add in a directive to limit the HTTP access methods to GET, POST and HEAD.
<Directory /var/www/empty>
        Options Indexes FollowSymLinks
        AllowOverride None
        Require all granted
    <LimitExcept GET POST HEAD>
        Require all denied
    </LimitExcept>
</Directory>
/var/www/html is usually the web root of the apache httpd server. In this case, the earlier "Directory /var/www" section, allows access to /var/www and its subdirectories which includes /var/www/html. We tightened the access and changed it to "/var/www/empty" and any subdirectories or files inside /var/www/empty. We will create an empty directory there.
Create the empty directory /var/www/empty and set its permissions with the following 2 commands.
chmod 755 /var/www/empty
Let's put in an empty index.html file in the empty directory. Run the following commands.
chmod 644 /var/www/empty/index.html
Our reverse proxy should use TLS and listen on 443. For an actual production server, you can get SSL certificates from a CA (Certificate Authority). In our case, we will generate a self signed certificate.
openssl req -x509 -nodes -days 365 -newkey rsa:2048 -keyout /etc/ssl/mycerts/private.key -out /etc/ssl/mycerts/public.crt
Enter the relevant information when prompted by openssl. For common name, we use a test domain "apxy.nighthour.sg"
On a workstation, browse to https://ssl-config.mozilla.org/. We will generate a TLS/SSL configuration using the Mozilla SSL Configuration generator and use this as a base for our own configuration. Select "Apache" on the web form and the "Intermediate" option. Enter "2.4.29" for server version. Openssl version is 1.1.1.
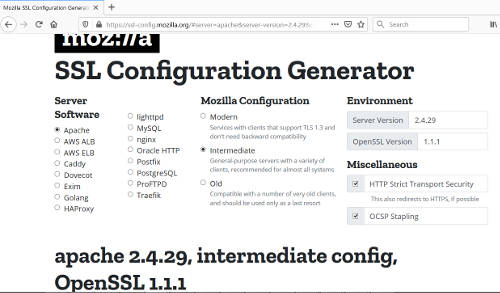
Copy out the configuration, we will modify it and use it for our TLS/SSL configuration. Enable the following modules, mod_ssl, mod_headers, mod_proxy, mod_proxy_http and mod_allowmethods.
Take note that the mod_allowmethods is experimental status, we are using it here to restrict the HTTP methods that can be proxied. A trade off is made as we considered the internal application to be far "less secured" than even an apache httpd module that is still experimental. As such, we want to reduce as much as possible the attack surface of the internal application and this includes restricting the HTTP methods.
a2enmod headers
a2enmod proxy
a2enmod proxy_http
a2enmod allowmethods
Create a configuration file for our SSL virtualhost using nano.
Add in the following content.
<VirtualHost *:443>
    ServerName  apxy.nighthour.sg
    ServerAlias apxy.nighthour.sg
    DocumentRoot /var/www/empty

    ErrorLog ${APACHE_LOG_DIR}/error.log
    CustomLog ${APACHE_LOG_DIR}/access.log combined

    SSLEngine on
    SSLCertificateFile      /etc/ssl/mycerts/public.crt
    SSLCertificateKeyFile   /etc/ssl/mycerts/private.key

    # Use http 1.1
    Protocols http/1.1

    # HTTP Strict Transport Security (mod_headers is required) (63072000 seconds)
    Header always set Strict-Transport-Security "max-age=63072000"

    SSLProxyEngine on

    <Proxy "*">
        AllowMethods GET POST
    </Proxy>

    <Location "/myinternalapp/">

        AuthType basic
        AuthName "Restricted Access"
        AuthUserFile "/etc/apache2/securesite/passwd"
        Require valid-user

        SetEnv force-proxy-request-1.0 1
        SetEnv proxy-nokeepalive 1

        ProxyPass "https://192.168.89.30/myinternalapp/"
        ProxyPassReverse "https://192.168.89.30/myinternalapp/"
    </Location>

</VirtualHost>

# intermediate configuration, tweak to your needs
SSLProtocol             all -SSLv3 -TLSv1 -TLSv1.1
SSLCipherSuite          ECDHE-ECDSA-AES128-GCM-SHA256:ECDHE-RSA-AES128-GCM-SHA256:ECDHE-ECDSA-AES256-GCM-SHA384:ECDHE-RSA-AES256-GCM-SHA384:ECDHE-ECDSA-CHACHA20-POLY1305:ECDHE-RSA-CHACHA20-POLY1305:DHE-RSA-AES128-GCM-SHA256:DHE-RSA-AES256-GCM-SHA384
SSLHonorCipherOrder     off
SSLSessionTickets       off

SSLUseStapling On
SSLStaplingCache "shmcb:logs/ssl_stapling(32768)"
Exit nano and save the changes. The ServerName and ServerAlias are set to "apxy.nighthour.sg". You should set this to your own actual domain name. The ProxyPass setting enables the proxying to the internal enterprise application IP address (192.168.89.30). It proxies to the "/myinternalapp/" directory. You can change these to suit your environment setup.
Basic Authentication is enabled for accessing the "/myinternalapp/" location. Let's create the password file storing the credentials for basic authentication. Take note that the CIS Apache Httpd hardening benchmark warns that both basic authentication and digest authentication are outdated and should be disabled.
In this case, the internal enterprise application has got its own login mechanism. The basic authentication is just a means to enhance security and reduce the attack surface by restricting access to company users. Instead of exposing to the whole public internet, it is now exposed only to company users who have the basic authentication credentials.
To restrict the HTTP methods for proxying, the allow methods module is used. Only HTTP GET, POST are allowed. Note that the HEAD method is allowed when GET is allowed. The SSLProxyEngine option turns on TLS/SSL proxying. This allows proxying to a TLS/SSL enabled backend application.
Take note that two environment variables "SetEnv force-proxy-request-1.0 1" and "SetEnv proxy-nokeepalive 1" are set so that the proxying to the backend server uses HTTP 1.0. This is a mitigation against HTTP request smuggling attack. HTTP request smuggling makes use of the different interpretation of multiplexed HTTP requests by the proxy and the backend server, to compromise the proxy setup.
Many proxy setups will be affected by this. It is necessary to mitigate against this vulnerability through the use of WAF or to use a non multiplexed protocol like HTTP 1.0. Another possible mitigation is to use the same software for both the proxy and the backend webserver, this way they will both interpret HTTP requests similarly.
Run the following commands to create the securesite directory and create a basic authentication user credential.
htpasswd -c /etc/apache2/securesite/passwd mycompanyappuser1
chmod 750 /etc/apache2/securesite
chmod 640 /etc/apache2/securesite/passwd
chgrp www-data /etc/apache2/securesite
chgrp www-data /etc/apache2/securesite/passwd
Enter a strong complex password, use at least 14 characters, alphanumeric, upper and lower case, as well as special characters.
Ok, now enable our new ssl virtualhost.
We can disable the default port 80 virtualhost. Since this setup is for company users, it is relatively easy to let the users know that they should only access the TLS/SSL website.
Edit the /etc/apache2/ports.conf using nano. Replace the content with the following.
# If you just change the port or add more ports here, you will likely also
# have to change the VirtualHost statement in
# /etc/apache2/sites-enabled/000-default.conf

#Listen 80

<IfModule ssl_module>
        Listen 10.1.0.175:443
</IfModule>

<IfModule mod_gnutls.c>
        Listen 10.1.0.175:443
</IfModule>

# vim: syntax=apache ts=4 sw=4 sts=4 sr noet
10.1.0.175 is the company IP address assigned to the Apache Proxy VM. You can change this if your IP is different.
Edit /etc/apache2/conf-enabled/charset.conf using nano. Uncomment the "AddDefaultCharset UTF-8". The content of the file should look like this.
# Read the documentation before enabling AddDefaultCharset.
# In general, it is only a good idea if you know that all your files
# have this encoding. It will override any encoding given in the files
# in meta http-equiv or xml encoding tags.

AddDefaultCharset UTF-8

# vim: syntax=apache ts=4 sw=4 sts=4 sr noet
Edit /etc/apache2/conf-enabled/security.conf using nano. Replace the content with the following.
#
# Disable access to the entire file system except for the directories that
# are explicitly allowed later.
#
# This currently breaks the configurations that come with some web application
# Debian packages.
#
<Directory />
   AllowOverride None
   Require all denied
</Directory>


# Changing the following options will not really affect the security of the
# server, but might make attacks slightly more difficult in some cases.

#
# ServerTokens
# This directive configures what you return as the Server HTTP response
# Header. The default is 'Full' which sends information about the OS-Type
# and compiled in modules.
# Set to one of:  Full | OS | Minimal | Minor | Major | Prod
# where Full conveys the most information, and Prod the least.
#ServerTokens Minimal
ServerTokens Prod
#ServerTokens Full

#
# Optionally add a line containing the server version and virtual host
# name to server-generated pages (internal error documents, FTP directory
# listings, mod_status and mod_info output etc., but not CGI generated
# documents or custom error documents).
# Set to "EMail" to also include a mailto: link to the ServerAdmin.
# Set to one of:  On | Off | EMail
#ServerSignature Off
ServerSignature Off

#
# Allow TRACE method
#
# Set to "extended" to also reflect the request body (only for testing and
# diagnostic purposes).
#
# Set to one of:  On | Off | extended
TraceEnable Off
#TraceEnable On

#
# Forbid access to version control directories
#
# If you use version control systems in your document root, you should
# probably deny access to their directories. For example, for subversion:
#
#<DirectoryMatch "/\.svn">
#   Require all denied
#</DirectoryMatch>

#
# Setting this header will prevent MSIE from interpreting files as something
# else than declared by the content type in the HTTP headers.
# Requires mod_headers to be enabled.
#
Header set X-Content-Type-Options: "nosniff"

#
# Setting this header will prevent other sites from embedding pages from this
# site as frames. This defends against clickjacking attacks.
# Requires mod_headers to be enabled.
#
Header set X-Frame-Options: "sameorigin"


# vim: syntax=apache ts=4 sw=4 sts=4 sr noet
The security configuration only set a small number of HTTP headers that can improve application security. It also has minimal hardening settings. To harden the apache httpd, refer to the CIS Apache httpd benchmark. To set application security header, refer to OWASP Secure Headers Project. The internal enterprise application should also be hardened according to the vendor advice as well as security best practices.
Disable the cgi-bin configuration. We do not need cgi functionality.
We are done for simple basic configuration. Reboot the server and test the proxying to the internal application.
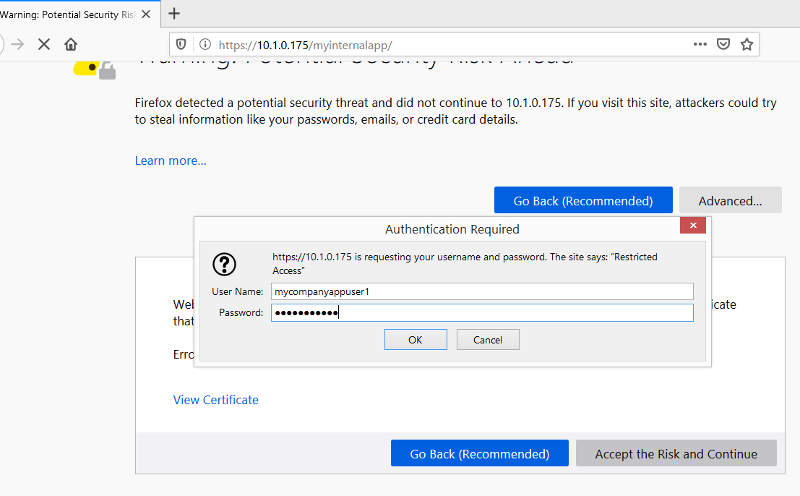
After the Apache Proxy VM boots up. We can test our proxying. Open up a browser on a workstation and surf to https://10.1.0.175/myinternalapp/, we should get the basic authentication prompt. The security warning on the webpage is due to the use of self signed certificate in our setup. In this case, we can just accept the risk and proceed since it is our own self signed certificate and website. For actual production use, you should be using a proper CA signed certificate.
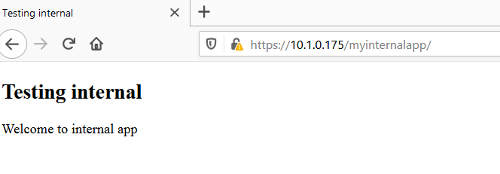
Once we enter the right credentials, we should get to a test page on the internal application.
For more information on configuring apache httpd as a reverse proxy, refer to the Apache Reverse Proxy Guide.
Changing Password
Now that we have a basic Apache Proxy VM set up, it is time to change the password for the apxyuser1 account. Login as apxyuser1 using the putty client. Issue the following command.
Enter a new password that is at least 20 characters long, alphanumberic with both upper and lower case characters, and special characters. This is important to prevent unauthorized brute forcing. To make managing passwords easier, a password management tool like Bruce Schneier Password Safe can be used.
Password Safe can be used together with a friendly SSH client like Putty. This makes logging in using different long complex passwords, a simple matter of copying and pasting from password manager to ssh client.
While password login may be sufficient for the use case of a single small company with limited number of internal servers. To really secure SSH access, the recommendation is to use PKI (Public Key Infrastructure), key based authentication. The concept is generate a public/private key pair, the public key is copied over to the linux server and the private key protected with a long complex passphrase stored securely on the user workstation.
Ssh is then configured to disable password login and only allow key based login. When the user wants to ssh into the linux server, he or she needs to supply the passphrase to the local private key to allow authentication. Access is now based on both what you have (private key) and what you know (your passphrase).
Different keys should be used for different servers, and the private keys protected by different long complex passphrases. Password manager like Pass Safe can be used.
Some of the disadvantages of key based authentication is the issue of key management and how to revoke keys which are compromised etc... But this method is generally more secure than password authentication.
Do a google search on the internet and there are many good articles on how to setup key based ssh authentication. The Ubuntu Commnity Wiki has an article on this.
Further Enhancements
The article focuses mainly on getting the simple proxy system up and running. It doesn't contain a lot of details and steps for hardening the system. To enhance and improve the setup; first and foremost is to harden the system. Refer to the CIS benchmarks and use it as a base guide for securing and hardening the system.
The reverse proxy setup can be improved through the use of a web application firewall like Mod Security and the setting up of more HTTP/web security headers. If greater performance is required, a possible alternative is to consider using Nginx as a replacement for Apache httpd.
Nginx is an extremely high performance web server that can serve as a reverse proxy. In recent years, it has gained much market share from Apache httpd.
In our setup, we have two roles for the Apache Proxy VM, as a reverse proxy and as a gateway/NAT/firewall. The gateway/NAT/firewall role can be separated out and setup on another dedicated linux vm. This will help to improve security as the attack surface for each system (single use/single role) is now much smaller.
Conclusion and Afterthought
This is a long article focusing on infrastructure setup. It tries to balance between simplicity and having the required security, so that a beginner can follow and use this as a first step to build up their own system.
Some of the basics of infrastructure management remain the same despite the move to cloud computing in recent years. The phrase that the cloud is just someone else computer holds true. It takes some of administrative tasks away from end users but the cloud providers' engineers are working behind the scene to manage/administer and maintain the physical infrastructure. Their maintainence may be made easier through the use of modern automation techniques, tools and customized software/setup that big cloud providers can develop inhouse on their own.
Cloud computing may not be for everyone though. For some enterprises, it may actually be cheaper to maintain their own infrastructure. An example is Dropbox which moves to its own inhouse cloud infrastructure. For others, it can be due to the need for security, like government agencies that deal with classified and national security information. Yet, there can others like small companies that don't really have a need to go to the cloud, or those who prefer to have control over their own infrastructure.
Whatever the choice, infrastructure management is changing in our modern times. There are more virtualization, containerizations, orchestrations and automation. Information Secrity or Cyber Security is part of all these; to ensure the Confidentiality, the Integrity and the Availability of our critical infrastructure and data.
Useful References
- Center for Internet Security, provides a number of security hardening benchmarks for ubuntu, apache httpd etc...
- VirtualBox User Manual, The official virtualbox user manual on how to use and operate virtualbox.
- Putty SSH Software, Useful ssh client and tools.
- Ubuntu Security Notice, Canonical website that provides security alerts on Ubuntu Linux.
- Mozilla SSL Config Generator, Mozilla website that helps to generate recommended configuration for TLS/SSL for popular web servers.
- OWASP Secure Headers Project, OWASP project that focuses on application security headers.
- Apache Httpd 2.4 Documentation, Official Apache Httpd documentation that provides details on how to configure and use Apache httpd 2.4.
- Apache Reverse Proxy Guide, A short how to on configuring Apache Httpd as a reverse proxy.
- Ubuntu Server Guide, Official Ubuntu guide on how to configure Ubuntu 18.04 LTS.
- Ubuntu Community Wiki Article on SSH Key login, An article on how to configure ssh key based authentication.
- Password Safe, The password manager designed by Bruce Schneier. It is useful utility to manage many long complex passwords for different applications.
- Mod Security, A popular opensource Web Application Firewall.
- Nginx, A fast opensource web server that can serve as a reverse proxy.
- Web Application Security Headers, An earlier article on some of the security headers for web applications.
- HTTP Request Smuggling, An article explaining HTTP request smuggling attack. This attack can affect many proxy setups. Mitigations need to be taken against such a vulnerability.
- HTTP request smuggling: HTTP/2 opens a new attack tunnel, An article about how HTTP request smuggling can affect proxy setups that use HTTP/2.
- Amazon HTTP Desync library, an opensource library that can be used by HTTP engines such as Nginx to defend against HTTP Desync/HTTP Request Smuggling attacks.
If you have any feedback, comments, corrections or suggestions to improve this article. You can reach me via the contact/feedback link at the bottom of the page.
Article last updated on Oct 2020.