Setting up a Test Lab using Google Cloud and strongSwan Ipsec VPN

Know thy self, know thy enemy. A thousand battles, a thousand victories. 知己知彼百战百胜。
, Sun Tzu (孙子)
3 June 2018
Introduction
As cloud computing and infrastructure as code gain wider adoption, more and more companies are moving their IT infrastructure and applications into the cloud. This often requires a new model of operation, to take full advantage of what the cloud has to offer and to ensure the security of IT assets. IT and Security professionals have to keep up and learn the skills of operating in the cloud.
This article shows how to set up an isolated test lab environment on Google Cloud Platform and connecting it to a local network through strongSwan Ipsec VPN. A site to site VPN tunnel is configured such that local hosts can access specific services on the isolated test lab. The compute instances on the test lab though are denied access to the internet and to the local network, creating an isolated environment. A separate management subnet on Google Cloud is used to manage the test lab.
This basic design can be extended further by adding new subnets or VPCs (Virtual Private Cloud), creating a full cloud infrastructure that can serve simple production needs. By starting small, this article hopes to make it easier for IT professionals and small companies to learn about Cloud Computing and software defined infrastructure.
Design of the Test Lab and Network
The following diagram shows what the architecture looks like.

On the Google side, it consists of a single VPC (Virtual Private Cloud) with 2 subnets defined. 172.16.0.0/24 is the management subnet, compute instances (virtual machines) in this subnet can be assigned public ips to access the internet. A compute instance running strongSwan is set up here to establish an IPsec VPN tunnel to the office LAN. We will set up two instances in the management subnet, the vpn server and a management server.
The second subnet 172.16.1.0/24 in the VPC is meant for the isolated test lab. Compute instances created here are not assigned public IP addresses and cannot access the internet. Firewall rules are configured such that hosts in the management subnet can access certain services such as SSH, HTTP, HTTPS etc... in the testlab subnet. Hosts in the testlab subnet cannot make outgoing connections to the management subnet. We will create 2 lab instances in the testlab subnet.
In Google cloud platform, you cannot see the public ip address assigned to an instance from within the host operating system. The host OS will only show the private ip address on its network interface. The public ip though is mapped to the host. It can be viewed from the Google Cloud console or through the gcloud command line tool. Firewall rules that allow internet access to services such as SSH, HTTP can be configured and tagged to the instance. These services and ports will be accessible through the public ip of the instance.
By default both private and public ip addresses are dynamically assigned to instances when they are created. This is a cloud feature to allow for elasticity, where new instances can be started up or existing instances terminated on demand. Static IPs have to be explicitly reserved. For the vpn server instance, we will reserve both a static public and internal ip address.
The office LAN is a typical small office network. It has a single gateway with two interfaces, a WAN (Wide Area Network) interface for the internet and an internal interface for the office network - 192.168.1.0/24. The WAN interface of the gateway has a single public IP address. The internal interface is set to 192.168.1.254. Hosts in the LAN connect to the internet through the gateway at 192.168.1.254. The gateway uses NAT (Network Address Translation) to masquerade the private IP addresses to its single public ip, allowing internet access.
The following diagram shows how the office LAN is set up. The yellow line represents the ipsec VPN tunnel that is established between the local vpn server in the LAN and the remote vpn server on Google Cloud. Hosts and PCs in the office will set up a static route for 172.16.0.0/16 that uses the local vpn server at 192.168.1.201. This allows access from the office LAN to the remote test lab.

Notice that the local vpn server has only one network interface with ip address 192.168.1.201. Traffic from the LAN hosts meant for the remote test lab (172.16.1.0/24) and management subnet (172.168.0.0/24) will come in through this interface where it will then be tunneled back out using Ipsec to Google cloud. The replies from Google cloud will likewise travel through the Ipsec tunnel back to 192.168.1.201 and then out to the LAN hosts.
For a small network, such one armed VPN setup is usually sufficient. Bigger network where lots of traffic need to travel through the tunnel or where network segmentation and segregation is required, a multihomed vpn server can be used.
The site to site strongSwan Ipsec VPN tunnel will use public/private key (PKI certificates) for authentication.
Setting up the Test Lab Infrastructure
With cloud computing, infrastructure setup becomes easy and can be done through clicking options in a web interface, command line tools or API calls. In the traditional data center, such a test lab will require physical servers, switches, routers and firewalls. The cloud now takes care of these. Engineers can focus on the design and automation of infrastructure provisioning through scripts and software.
We will mainly use the gcloud command line tool to create the required infrastructure for the test lab. A Google Cloud account and Google Cloud SDK is required. Refer to Google Cloud SDK Installation for details on installing the sdk.
Note that performing the instructions in this article can incur charges on your Google Cloud account.
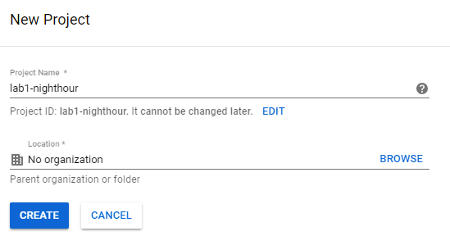
Log into the Google Cloud Console and create a new project called "lab1-nighthour". The project needs to have billing enabled in order to use Google Compute Engine.
After the project has been created, we can use the gcloud command line tool to create the test lab infrastructure. Run the following command to show the newly created project.
Change to the newly created project by doing a
There will be a prompt asking whether to create a new configuration or re-initialize the existing configuration. In this case, let's create a new configuration. Enter "lab1-nighthour" when prompted for configuration name. Select the google account that this configuration will be using. Select the newly created "lab1-nighthour" project when prompted to pick the project to use.
Let's set a default region and zone using the following commands
gcloud config set compute/zone asia-southeast1-a
This sets the region asia-southeast1, which is Singapore. The zone is set to asia-southeast1-a. Region is a geographical location where Google operates a datacenter. Zones are isolated areas in a region. Replicating infrastructure across zones can help to improve availability. i.e. When a zone fails, the system can still function properly using the IT assets in other zones. For a large global enterprise, IT assets can be replicated across multiple geographical regions to achieve planet wide scalability and availability.
In Google Cloud Platform, some types of computing resources are local in a zone. Others are global in nature. Care has to be taken when building a cloud infrastructure to ensure high availability and disaster recovery. Refer to the Google documentation for a more detailed explanation of region and zone.
Run the following command and click yes when prompted to enable compute engine.
We will create a private custom VPC and the 2 subnets using the following commands.
gcloud compute networks subnets create mgmt-subnet --network=testlabvpc --region=asia-southeast1 --range=172.16.0.0/24
gcloud compute networks subnets create testlab-subnet --network=testlabvpc --region=asia-southeast1 --range=172.16.1.0/24
Once the subnets are created, we can proceed to reserve static ips for the instances. The following commands will reserve 2 static internal ips (vpn server and mgmt server) and one static external public ip for the vpn server.
--region asia-southeast1 --subnet mgmt-subnet \
--addresses 172.16.0.2,172.16.0.3
gcloud compute addresses create vpnserver-ext-ip \
--region asia-southeast1
List the reserved IP addresses using the following command. Note down the external public ip that is reserved, we will need it when creating the vpn server instance.
Create the following firewall rules for the Google VPC.
gcloud compute firewall-rules create mgmt-internal-allow-access --direction=INGRESS --priority=1000 --network=testlabvpc --action=ALLOW --rules=tcp:22,tcp:80,tcp:443,tcp:8080,icmp --source-ranges=172.16.0.0/24
gcloud compute firewall-rules create testlab-internal-deny-all --direction=EGRESS --priority=1000 --network=testlabvpc --action=DENY --rules=all --destination-ranges=0.0.0.0/0 --target-tags=testlab-denyall
The first rule allows incoming SSH port 22, the Ipsec UDP ports 500 and 4500 to instances assigned the target tag of "vpn-allow-access". This tag will be assigned to the vpn server instance.
The second rule allows incoming SSH(22), HTTP(80), HTTPS(443), tcp port 8080 and icmp traffic from the management subnet to all instances in the VPC. This rule allow hosts in the management subnet to access and manage the instances in the test lab subnet. It also the instances in the management subnet to manage other potential subnets that can be added in the future.
The last firewall rule deny all outgoing connections for instances with a target tag of "testlab-denyall". This tag will be added to instances that are created in the testlab subnet, preventing them from making outgoing internet connections or connections to other subnets such as the management subnet.
The following command will create the the vpnserver instance in the asia-southeast1-a zone.
The vpn server is assigned both an internal static ip address 172.16.0.2 and an external static address 35.198.231.186. These addresses are reserved in the earilier step. For this test lab example, the instances are all f1-micro. f1-micro instances have 1 virtual CPU and 512 MB of RAM. In a real production environment, the instances can be sized appropriately. The vpn server is assigned the Ubuntu 18.04 boot image with a version dated 20180522. The "vpn-allow-access" firewall tag is added to the instance.
Let 's create the rest of the instances.
gcloud compute instances create labserver0 --zone=asia-southeast1-b --machine-type=f1-micro --subnet=testlab-subnet --no-address --maintenance-policy=MIGRATE --tags=testlab-denyall --image=ubuntu-1804-bionic-v20180522 --image-project=ubuntu-os-cloud --boot-disk-size=10GB
gcloud compute instances create labserver1 --zone=asia-southeast1-c --machine-type=f1-micro --subnet=testlab-subnet --no-address --maintenance-policy=MIGRATE --tags=testlab-denyall --image=ubuntu-1804-bionic-v20180522 --image-project=ubuntu-os-cloud --boot-disk-size=10GB
Use the following command to see the instances that have been created.
Notice that the mgmtserver instance is dynamically assigned an external public ip address. This allows the mgmtserver to make outgoing connections to the internet. However, incoming connections to the mgmtserver will be blocked as we have not set any firewall rules to enable incoming access. For the vpn server instance, we have associated it with the "vpn-allow-access" firewall tag, allowing incoming port 22 (SSH), udp port 500 and 4500 for Ipsec VPN.
SSh into the vpnserver instance using the following command
On first run, the command will automatically create a RSA key/pair. It adds the relevant public key to the project meta data that enable SSH access to the compute instances in the project. You should be logged into vpnserver through ssh. To change to root user, issue
Explore and look around the Ubuntu 18.04 compute instance. It is just like any regular linux system. Take note that best practice recommends that an IT administrator should only switch to root for privilege tasks. Type "exit" to come out of root and back to a normal user.
The test lab infrastructure has been set up in less than 15 minutes. In a traditional enterprise IT environment, setting up such a physical test lab will likely take weeks, from the ordering of machines and network equipment, the provisioning of rackspace, power supply, waiting for the delivery of equipment, the physical racking etc... All these is now taken care of by the cloud provider.
The above commands can be incorporated into a script, making it extremely easy to create the infrastructure. It is just as easy to remove these computing resources when they are no longer required. One can just delete the entire project.
Initial Setup and Installing Required Packages
Ssh into the vpn server instance again and change to the root user. One of the first thing is to set the timezone. The default is UTC. Issue the following command as root user.
This sets the timezone to Singapore. Let's do some minor hardening. Note an actual production system should follow hardening guides such as those from CIS (Center for Internet Security). Tools like ansible can be useful to help with automated hardening. In our small example here, we will only do some minimal hardening.
Change the system UMASK to a more secure 077. The umask affects the default permission of files and directories that are created by a user. Having a value of "077" means that a file created by a user will be read/writable only for the user. A directory created will only be accessible by the user who created it. Open up /etc/login.defs with vim editor.
Change the line with "UMASK 022" to "UMASK 077". Save the changes. The "077" umask will only be effective for the root user. This is due to the "USERGROUPS_ENAB yes" setting in login.defs. A normal user will get a umask of "007".
Update the instance image with the latest software patches.
apt-get dist-upgrade
Let's do a quick reboot before continuing. Issue the following command
Wait for the instance to come up again and then ssh into it. Change to the root user and install the following packages.
Click yes when prompted to save the iptables rules. We have not set any custom rules yet. Increase the default file descriptors limit from 1024 to 65536. In linux, just like any unix systems, network socket connections are considered as a kind of file descriptor.
Add the following 2 lines to limits.conf and save the changes.
* hard nofile 65536
Add a strongswan group to the system and modify the strongswan user so that it has this as its default group. We are going to run the strongSwan charon daemon as this non-root user later.
usermod -g strongswan strongswan
Setting up the CA and certificates
Although strongSwan has its own facilities for certificates generation, we will use another CA package, EasyRSA for this purpose. EasyRSA is part of the OpenVPN project and is usually used to generate PKI (Public Key Infrastructure) certificates for OpenVPN. EasyRSA can also generate certificates for strongSwan.
OpenVPN is a popular opensource VPN software that uses SSL instead of Ipsec. It can also be used to set up a VPN tunnel to Google Cloud. For this article though, we will use strongSwan.
Issue the following command to create a new CA.
Change into the directory and modify the vars file.
vim vars
Look for the keysize and change it to 4096. Change the settings for key country, ou setc... The following shows the lines to be changed.
export KEY_COUNTRY="SG"
export KEY_PROVINCE="Singapore"
export KEY_CITY="Singapore"
export KEY_ORG="Nighthour"
export KEY_EMAIL="myemailaddress@nighthour.sg"
export KEY_OU="Nighthour"
Generate the CA private key and certificate with the following commands.
source vars
./clean-all
./build-ca
Just hit enter and use the default settings when prompted for Country Name, Province etc... Apart from the common name, these values are already configured earlier in the vars file and exported as environment variables.
Create the private key and certificate for the remote vpn server. The remote vpn server refers to the vpn server instance on Google Cloud.
Press enter to accept the default values. When prompted to Sign the Certificate, select "y". Select "y" again to commit the certificate.
Create the private key and certificate for the local vpn server on the office LAN.
Again accept the default values and click on "y" to commit the certificate. The certicates and private keys are placed in the keys directory under vpn-ca. In this example, we are creating the CA on the remote vpn server. Actually the CA doesn't have to be on the vpn server. It can be on a dedicated local machine specifically used for issuing certificates. The CA though needs to be secured as it holds all the keys for authentication and encryption.
Configuring strongSwan at the remote VPN Server
We can now configure strongSwan on the remote vpn server. First copy the certificates for the remote gateway into the correct location for strongSwan.
cp keys/remote-vpn-gw.crt /etc/ipsec.d/certs/
cp keys/ca.crt /etc/ipsec.d/cacerts/
Set the proper ownership and permissions on these files and directories.
chgrp strongswan /etc/ipsec.d/private
chmod 750 /etc/ipsec.d/private
chown strongswan /etc/ipsec.d/private/remote-vpn-gw.key
chmod 400 /etc/ipsec.d/private/remote-vpn-gw.key
chmod 644 /etc/ipsec.d/certs/remote-vpn-gw.crt
chmod 644 /etc/ipsec.d/cacerts/ca.crt
Edit the /etc/ipsec.secrets to point to the remote vpn server private key.
Add the following line to ipsec.secrets
Secure the ownership and permissions for ipsec.secrets
chmod 400 /etc/ipsec.secrets
Set charon daemon to run as the strongswan user instead of root by editing the charon.conf
Uncomment the "# user =" line and set it to
Save the changes. Edit the /etc/ipsec.conf to configure the vpn ipsec settings.
Delete all the existing lines in the file and put in the following
config setup
	 strictcrlpolicy=no
	 uniqueids = yes
	 charondebug="ike 2, esp 2,  cfg 2, knl 2"

conn ikev2-vpn
       auto=add
       compress=no
       keyexchange=ikev2
       aggressive = no
       type = tunnel
       fragmentation = yes
       forceencaps = yes
       ike = aes256gcm16-prfsha384-ecp384!
       esp = aes256gcm16-prfsha384-ecp384!
       lifetime = 1h
       dpdaction = clear
       dpddelay = 300s

       leftid="C=SG, ST=Singapore, L=Singapore, O=Nighthour, OU=Nighthour, CN=remote-vpn-gw, N=EasyRSA, E=myemailaddress@nighthour.sg"
       left=172.16.0.2
       leftsubnet=172.16.0.0/24,172.16.1.0/24
       leftcert = /etc/ipsec.d/certs/remote-vpn-gw.crt
       leftsendcert = always

       rightid="C=SG, ST=Singapore, L=Singapore, O=Nighthour, OU=Nighthour, CN=local-vpn-gw, N=EasyRSA, E=myemailaddress@nighthour.sg"
       right=%any
       rightsourceip = 10.0.0.1
We set strictpolicy = no , as CRL (certificate revocation list) is not required for authentication in this simple setup. For a case where there can be multiple sites connecting to a remote vpn, a proper CRL should be set up. The CRL will allow certificates to be revoked, denying access to sites using the revoked certificates.
In the Ipsec configuration, compression is disabled. The key exchange is set to ike version 2. Aggressive mode is disabled and the VPN is configured as tunnel mode. Modern strong ciphersuites are selected for both esp and ike (aes256gcm16-prfsha384-ecp384!). The use of Diffie Hellman group in the ciphersuite will ensure Perfect Forward Secrecy (PFS).
In simplified terms, Perfect Forward Secrecy means if the server or a session key is compromised, it will not affect other session keys that are used for encrypting traffic. Past traffic that are recorded will thus be protected even if a server or session key is compromised.
The settings starting with "left" represent the configuration on the remote vpn server. The "right" settings are for the local LAN vpn server. We configured the remote vpnserver identity using the leftid. The value is the full distinguished name (DN) of the remote vpn server certificate. To view the distinguished name of a certificate, you can just cat the certificate generated by EasyRSA.
The Subject field contains the full distinguished name (DN) of the certificate. The ip address of the remote vpn server is set in the left parameter. The two subnets 172.16.0.0/24 and 172.16.1.0/24 are configured in the leftsubnet. leftcert specifies the location of the remote vpn server certificate.
The right settings are for the local LAN vpn server. It includes the distingushed name (DN) of the local vpn server certificate. It sets "right=%any" , meaning our local LAN vpn server can have any ip address. It also includes a field "rightsourceip = 10.0.0.1". This is a virtual ip that will be installed to serve as the source ip inside the VPN tunnel from the office LAN.
Virtual IPs can be useful to provide a level of isolation between the two sites. In this case, we choose a private 10.0.0.1 ip address that will "hide" the real ip address of the local office vpn server. When choosing internal ip addresses we should always use IPs in the private range to reduce the risk of internal traffic leaking out to the internet.
Configuring Iptables at Remote VPN Server
The strongSwan configuration is done. We can proceed to set up the iptables rules on the remote vpn server. Run the following commands.
# Configure Network address translation to masquerade 10.0.0.1 to its own ip.
 iptables -t nat -F POSTROUTING
 iptables -t nat -A POSTROUTING -s 10.0.0.1 -d 172.16.0.2 -j ACCEPT
 iptables -t nat -A POSTROUTING -s 10.0.0.1 -d 172.16.0.0/16 -o ens4 -j MASQUERADE

 # Set MSS size to prevent fragmentation issues
 iptables -t mangle -F FORWARD
 iptables -t mangle -A FORWARD -m policy --pol ipsec --dir in -p tcp -m tcp --tcp-flags SYN,RST SYN -m tcpmss --mss 1361:1536 -j TCPMSS --set-mss 1360
 iptables -t mangle -A FORWARD -m policy --pol ipsec --dir out -p tcp -m tcp --tcp-flags SYN,RST SYN -m tcpmss --mss 1361:1536 -j TCPMSS --set-mss 1360

 # remote vpnserver to only accept these services directed to it
 iptables -A INPUT -i lo -j ACCEPT
 iptables -A INPUT -m conntrack --ctstate ESTABLISHED,RELATED -j ACCEPT
 iptables -A INPUT -p icmp --icmp-type 8 -m limit --limit 10/m  -j ACCEPT
 iptables -A INPUT -p icmp --icmp-type 11 -m limit --limit 10/m  -j ACCEPT
 iptables -A INPUT -p icmp --icmp-type 3 -m limit --limit 10/m  -j ACCEPT
 iptables -A INPUT -p tcp  --dport 22 -j ACCEPT
 iptables -A INPUT -p udp  --dport 500 -j ACCEPT
 iptables -A INPUT -p udp  --dport 4500 -j ACCEPT
 iptables -A INPUT -m limit --limit 10/m --limit-burst 15 -j LOG --log-prefix "firewall: "
 iptables -A INPUT -j DROP

 # remote vpnserver to only forward traffic for these services
 iptables -F FORWARD
 iptables -A FORWARD -m conntrack --ctstate ESTABLISHED,RELATED -j ACCEPT
 iptables -A FORWARD -p tcp -s 10.0.0.1 -d 172.16.0.0/24 --dport 22 -j ACCEPT
 iptables -A FORWARD -p tcp -s 10.0.0.1 -d 172.16.0.0/24 --dport 80 -j ACCEPT
 iptables -A FORWARD -p tcp -s 10.0.0.1 -d 172.16.0.0/24 --dport 443 -j ACCEPT
 iptables -A FORWARD -p tcp -s 10.0.0.1 -d 172.16.0.0/24 --dport 8080 -j ACCEPT

 iptables -A FORWARD -p tcp -s 10.0.0.1 -d 172.16.1.0/24 --dport 22 -j ACCEPT
 iptables -A FORWARD -p tcp -s 10.0.0.1 -d 172.16.1.0/24 --dport 80 -j ACCEPT
 iptables -A FORWARD -p tcp -s 10.0.0.1 -d 172.16.1.0/24 --dport 443 -j ACCEPT
 iptables -A FORWARD -p tcp -s 10.0.0.1 -d 172.16.1.0/24 --dport 8080 -j ACCEPT

 iptables -A FORWARD -p icmp --icmp-type 8 -m limit --limit 10/m  -j ACCEPT
 iptables -A FORWARD -p icmp --icmp-type 11 -m limit --limit 10/m  -j ACCEPT
 iptables -A FORWARD -p icmp --icmp-type 3 -m limit --limit 10/m  -j ACCEPT
 iptables -A FORWARD -m limit --limit 10/m --limit-burst 15 -j LOG --log-prefix "firewall: forward: "
 iptables -A FORWARD -j DROP

 # log outgoing connection from remote vpnserver
 iptables -F OUTPUT
 iptables -A OUTPUT -m limit --limit 10/m --limit-burst 15 -j LOG --log-prefix "firewall: output: "
We have set up the remote vpn server to do NAT for 10.0.0.1 into its own ip address 172.16.0.2. This means that we don't have to set up an additional route for the Google VPC to route traffic for 10.0.0.1. Notice that the INPUT chain is not flushed before inserting our rules. This is because the compute instance have a sshguard rule in the INPUT chain by default. We do not want to remove this default rule.
Logging is enabled for some of the iptables chain. These logs are sent to the system syslog. Firewall can generate a lot of logs and can cause syslog to become cluttered. For a production system, you may want to configure iptables to log to a separate file. In this simple example, the logs are sent to syslog.
Save the iptables rules using the following command.
Configure the Sysctl Kernel Settings on the Remote VPN Server
We are nearly done for the remote server. We need to enable ip forwarding on the remote vpn server and set a few other kernel parameters in sysctl.conf.
Empty out the file and put in these settings.
net.ipv4.conf.default.rp_filter = 1
net.ipv4.conf.all.rp_filter = 1
net.ipv4.tcp_syncookies = 1
net.ipv4.ip_forward = 1
net.ipv4.conf.all.accept_redirects = 0
net.ipv4.conf.all.send_redirects = 0
net.ipv4.conf.all.accept_source_route = 0
net.ipv4.conf.all.log_martians = 1
net.ipv4.conf.default.send_redirects = 0
We are done configuring the remote vpnserver. Reboot the remote vpn server instance for the settings to take effect.
Setting up the Local strongSwan VPN server
It is advisable to use a local server that runs the same version of Ubuntu 18.04. This will make troubleshooting and maintenance easier. The local vpn server configuration is similar to the remote vpn server. We will quickly run through the essential settings but will not repeat some of the steps.
Install the strongSwan and iptables-persistent packages on the local vpn server. We don't need the EasyRSA here. Before doing this, please also update the local vpn server to the latest software patches. Refer to the earlier section on configuring the remote vpn server on how to do this if you are not sure.
apt-get install strongSwan iptables-persistent
Just like the remote vpn server, set the UMASK to 077 and increase the file descriptor limits to 65536. Add a new strongswan group with gid 8000 and set this as the default group for the strongswan user. We will not repeat the steps here. Refer to the earlier section on the remote vpn server for the steps to do this.
We need to copy the private key and certificate for the local vpn server as well as the CA certificate from the remote vpn server. On the workstation machine where you have installed and configured the Google Cloud SDK earlier, issue the following commands. Note you need to do this using the same user account that has configured gcloud init.
sudo su -
cd vpn-ca
tar -czvf localcerts.tgz keys/local-vpn-gw.crt keys/local-vpn-gw.key keys/ca.crt
Move the localcerts.tgz to the home directory of the normal user account on the remote vpn server (the account before you change to root). It is usually the same user account as your current workstation.
chown [normal user name]: /home/[normal user name]/localcerts.tgz
Replace [normal user name] with the actual user account on the remote vpn server instance. On the local workstation, issue the following command to copy the localcerts.tgs over.
Delete away the localcerts.tgz on the normal user home directory in the remote vpnserver.
Transfer localcerts.tgz to the local vpn server and delete the copy on your local workstation machine. Extract localcerts.tgz on the local vpn server and copy the files to the corresponding ipsec.d locations. Delete away the localcerts.tgz and remove the empty keys directory.
mv keys/local-vpn-gw.crt /etc/ipsec.d/certs/
mv keys/local-vpn-gw.key /etc/ipsec.d/private/
mv keys/ca.crt /etc/ipsec.d/cacerts/
rm localcerts.tgz
rmdir keys
The reason that we delete away all the intermediate copies of the localcerts.tgz is for security hygiene. We don't want to have unnecessary copies of the private key lying around in different locations. Security hygiene is a good habit that system engineers and administrators should learn and pick up.
Set the proper ownership and permissions for these certificate files and the private key.
chgrp strongswan /etc/ipsec.d/private
chmod 750 /etc/ipsec.d/private
chown strongswan /etc/ipsec.d/private/local-vpn-gw.key
chmod 400 /etc/ipsec.d/private/local-vpn-gw.key
chmod 644 /etc/ipsec.d/certs/local-vpn-gw.crt
chmod 644 /etc/ipsec.d/cacerts/ca.crt
Modify the /etc/ipsec.secrets and set the location for the local vpn server private key. The following line should be added to ipsec.secrets
Set the proper ownership and permission for /etc/ipsec.secrets
chmod 400 /etc/ipsec.secrets
Set the charon daemon to run as the normal strongswan user insteead of root. Edit /etc/strongswan.d/charon.conf, uncomment the "# user=" and set it to the following.
Edit the /etc/ipsec.conf. Empty out the file and set the following lines
config setup
       strictcrlpolicy=no
       uniqueids = yes
       charondebug="ike 2, esp 2,  cfg 2, knl 2"

conn gcp
       auto=add
       compress=no
       keyexchange=ikev2
       aggressive = no
       type = tunnel
       fragmentation = yes
       forceencaps = yes
       ike = aes256gcm16-prfsha384-ecp384!
       esp = aes256gcm16-prfsha384-ecp384!
       lifetime = 1h
       dpdaction = clear
       dpddelay = 300s


       left=192.168.1.201
       leftid = "C=SG, ST=Singapore, L=Singapore, O=Nighthour, OU=Nighthour, CN=local-vpn-gw, N=EasyRSA, E=myemailaddress@nighthour.sg"
       leftcert = /etc/ipsec.d/certs/local-vpn-gw.crt
       leftsendcert = always
       leftsourceip=10.0.0.1

       rightid = "C=SG, ST=Singapore, L=Singapore, O=Nighthour, OU=Nighthour, CN=remote-vpn-gw, N=EasyRSA, E=myemailaddress@nighthour.sg"
       right=35.198.231.186
       rightsubnet=172.16.0.0/24,172.16.1.0/24
Apart from the left and right settings, the configuration are the same as the remote vpn server. The same ciphers are specified here. The left settings refer to local vpn server. The right settings refer to the remote vpn server. leftsourceip is set to 10.0.0.1. This means that the local vpnserver will request for a virtual ip 10.0.0.1. The remote vpn server has already configured 10.0.0.1 to be given out and will therefore grant the request.
right is set to the external public ip address 35.198.231.186 of the remote vpn server. This will allow the local vpn server to initialize a ipsec request to the remote Google Cloud site. The local strongSwan configuration is done. We can configure the iptables for the local vpn server.
Run the following commands
 #Configure Network address translation to masquerade local IPs to the 10.0.0.1 virtual ip.
 iptables -t nat -A POSTROUTING -s 192.168.1.201 -j ACCEPT
 iptables -t nat -A POSTROUTING -m limit --limit 60/m --limit-burst 120 -j LOG --log-prefix "firewall: nat: "
 iptables -t nat -A POSTROUTING -s 192.168.1.0/24 -d 172.16.0.0/16 -j SNAT --to 10.0.0.1

 #Set MSS size to prevent fragmentation issues
 iptables -t mangle -A FORWARD -m policy --pol ipsec --dir in -p tcp -m tcp --tcp-flags SYN,RST SYN -m tcpmss --mss 1361:1536 -j TCPMSS --set-mss 1360
 iptables -t mangle -A FORWARD -m policy --pol ipsec --dir out -p tcp -m tcp --tcp-flags SYN,RST SYN -m tcpmss --mss 1361:1536 -j TCPMSS --set-mss 1360

 #Set the local vpn server to only allow icmp and connections that are established.
 iptables -F INPUT
 iptables -A INPUT -i lo -j ACCEPT
 iptables -A INPUT -m conntrack --ctstate ESTABLISHED,RELATED -j ACCEPT
 iptables -A INPUT -p icmp --icmp-type 8 -m limit --limit 10/m  -j ACCEPT
 iptables -A INPUT -p icmp --icmp-type 11 -m limit --limit 10/m  -j ACCEPT
 iptables -A INPUT -p icmp --icmp-type 3 -m limit --limit 10/m  -j ACCEPT
 iptables -A INPUT -m limit --limit 10/m --limit-burst 15 -j LOG --log-prefix "firewall: "
 iptables -A INPUT -j DROP

 #Forward traffic only for local subnet to remote 172.16.0.0/16
 iptables -F FORWARD
 iptables -A FORWARD -m conntrack --ctstate ESTABLISHED,RELATED -j ACCEPT
 iptables -A FORWARD -s 192.168.1.0/24 -d 172.16.0.0/16 -j ACCEPT
 iptables -A FORWARD -m limit --limit 10/m --limit-burst 15 -j LOG --log-prefix "firewall: forward: "
 iptables -A FORWARD -j DROP

 #Log outgoing connections
 iptables -F OUTPUT
 iptables -A OUTPUT -m limit --limit 10/m --limit-burst 15 -j LOG --log-prefix "firewall: output: "
Notice that the forwarding rules will only forward from local subnet to remote. This is one more checks to prevent the remote hosts from accessing the local LAN network. The use of the virtual ip 10.0.0.1 in the vpn tunnel should already "hide" the local LAN since the remote site won't know how to route to the local 192.168.1.0/24 subnet. The forward rule is an additional check.
The local vpn server will NAT connections from the local LAN to the remote site using 10.0.0.1. NAT has the effect of hidding/protecting the local network. Remember the eariler iptables rule on the remote vpnserver, it also NAT 10.0.0.1 to its own ip 172.16.0.2. That rule is meant to avoid adding an additional route on the Google VPC for 10.0.0.1. It also has the effect that the remote hosts will "think" that 172.16.0.2 is accessing it even if the connections actually comes from hosts in the office LAN.
Save the iptables rules.
Let's configure the kernel parameters for the local VPN server. Set the following into the /etc/sysctl.conf.
net.ipv4.conf.default.rp_filter = 1
net.ipv4.conf.all.rp_filter = 1
net.ipv4.tcp_syncookies = 1
net.ipv4.ip_forward = 1
net.ipv4.conf.all.accept_redirects = 0
net.ipv4.conf.all.send_redirects = 0
net.ipv4.conf.all.accept_source_route = 0
net.ipv4.conf.all.log_martians = 1
net.ipv4.conf.default.send_redirects = 0
We are done. Reboot the local vpn server.
Starting and Testing the strongSwan Ipsec VPN
To start the vpn tunnel to the remote site. At the local vpn server, run the following command
If all the configurations are done properly. You should get a message saying
If there are errors look at the /var/log/syslog on both the remote vpn server and the local vpn server for details on what went wrong. tcpdump can also be used to help troubleshoot problems with the Ipsec connection. If you need to use tcpdump for troubleshooting, remember to filter out port 22, to prevent the SSH traffic between your workstation and the remote server from cluttering the network capture. An example, "tcpdump -nn -vv -i ensp4 not port 22".
Ping the remote vpn server at its internal ip address
We should be able to get ICMP replies from the remote vpn server. Ping the remote mgmt server at 172.16.0.3 and one of the host in the remote testlab. To see the internal ip addresses of these hosts, run the "gcloud compute instances list" on the workstation where the Google Cloud Sdk is installed and configured. You should get ICMP replies from these as well.
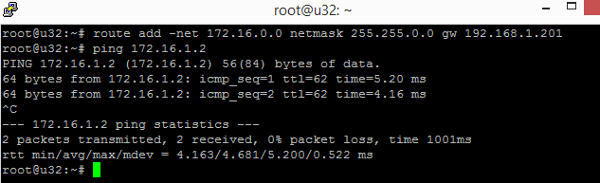
To enable other local LAN machines to access the remote test lab. Add a static route for 172.16.0.0/16 using the following command. The static route set up the local vpn server 192.168.1.201 as the gateway for traffic destined for 172.16.0.0/16.
ping 172.16.1.3
You should get ICMP relies.
Notice that we set a route for 172.16.0.0/16 , which covers both 172.16.0.0/24 and 172.168.1.0/24. In fact this route covers even more subnets such as 172.16.2.0/24, 172.16.3.0/24 up till 172.16.255.254/31. This can be useful if the remote test lab is expanded with more subnets. We don't have to go around setting new static routes.
If the local LAN uses DHCP that you can control, it may be possible to use DHCP to distribute the static route. Alternatively if the local LAN gateway allows the setting of static route, this route can also be set in the LAN gateway.
The assumption in this article is that all the hosts in the local LAN are allowed to access the remote test lab. If this is not the case, additional firewalls on the local vpn server may have to be set up.
Internal SSH to Test Lab and Clean up
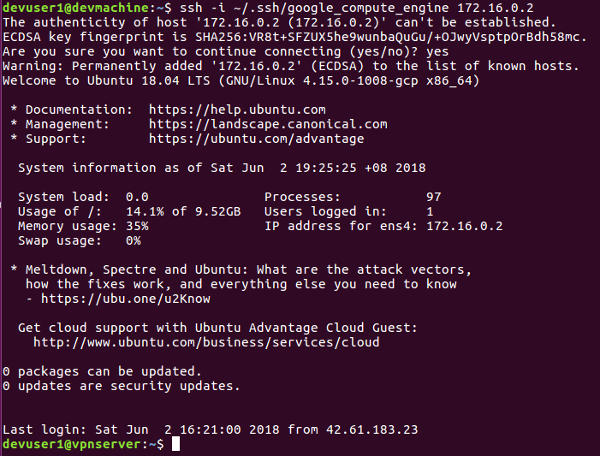
Let's try ssh into the remote test lab using their internal ips. First go to the workstation where the Google SDK is installed and configured. Make sure that a route to 172.16.0.0/16 via 192.168.1.201 has been set up. Test that you can ping 172.16.0.2.
We can use either the regular ssh command or the gcloud command to ssh into the remote instances through their private ips. In this example, we will use the regular ssh command. Run the following command
We should get logged into the remote vpnserver.
In the firewall rule that we have configured earlier for the remote vpn server instance, ssh is allowed from public ip addresses. Now that we can access the remote instances through their private ips, we should clean up and disable this setting. Run the following command to update the firewall rule.
Try to ssh into the remote vpn server using its public ip address.
This should eventually timed out with an error. After you are done with the test lab, shut down and delete these resources. Log in to the Google Cloud Console and delete the entire project to stop billing and charges from being incurred.
More on strongSwan and Linux Kernel Ipsec
strongSwan uses the linux kernel facilities to handle the actual Ipsec encryption. It just handles the SA (Security Association) negotiations and Ipsec security policies through IKEv1 (Internet Key Exchange 1) or IKEv2 (Internet Key Exchange 2). These SAs and security policies are installed into the kernel. The linux kernel itself will handle the Ipsec traffic based on the security policies and the SAs.
We can actually view these policies and security associations through the ip tool from the iproute2 utilities.
The following shows the security policies. It can be seen that traffic from 172.168.0.0/24 to 10.0.0.1/32 will be via a ESP tunnel with a source from 35.198.231.186 to 192.168.1.201. The reverse is also true, traffic from 10.0.0.1/32 to 172.168.0.0/24 will be via ESP tunnel with source from 192.168.1.201 to 35.198.231.186.
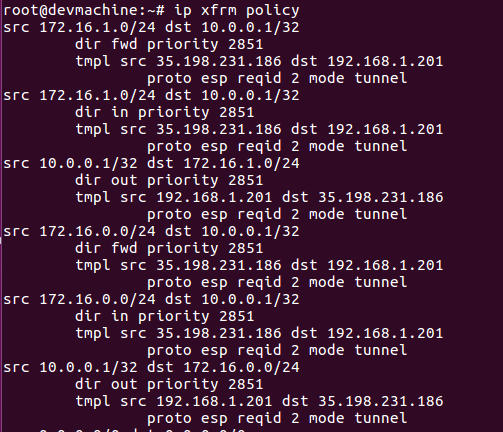
The internal IP address, 192.168.1.201 of the local vpn server, cannot traverse the public internet. Traffic from the local vpnserver will pass through the LAN gateway that will NAT this to the public ip address of the gateway. When we view the ip xfrm policy output on the remote vpn server, we will see the LAN gateway public ip address.
To tell the local vpn server that it should route 172.16.0.0/24 and 172.16.1.0/24 through the 10.0.0.1 virtual ip that is installed on the local vpn server, strongSwan uses linux policy based routing. A routing table 220 is installed.
ip route show table 220

A source address based policy rule is added to look up the table 220 for all packets. In table 220, 172.16.0.0/24 and 172.16.1.0/24 are to be routed via the default LAN gateway at 192.168.1.254 through the local virtual ip 10.0.0.1.
The flow from 10.0.0.1 to 172.16.0.0/24 and 172.16.0.1/24 has been registered in the kernel security policies. The ip xfrm policy shows these policies earlier. These flow will be encrypted using the esp tunnel.
What are the encryption algorithms and keys to use for the esp tunnel ? The kernel security associations contain these information. Running the following command will show the security associations, its encryption algorithms and the encryption keys.
Security Trust Boundaries in the Test Lab Architecture
The test lab setup has created an isolated cloud infrastructure that is accessible through a Ipsec VPN tunnel from the office LAN. Instances in the remote test lab subnet (172.16.1.0/24) cannot access the internet. In the example setup, these instances cannot communicate with each other as well.
It is an insolated lab instance that we can use for testing, perhaps running vulnerable web applications for security training or processing internal company information. Additional firewall rule can be added to the Google VPC to allow instances in the test lab subnet to communicate with each other. This can allow more complex applications to be run in the test lab. For example, a docker swarm can be set up for running dockerized applications.
The remote management subnet (172.16.0.0/24) can be used to administer and manage the instances in the test lab subnet. Instances in the management subnet can make outgoing connections to the internet. However, connections from the public internet to these instances are prevented. Internet access to UDP port 500 and 4500 are allowed for the vpn server instance in the management subnet. This is to facilitate the VPN tunnel from the office LAN.
The office LAN (192.168.1.0/24) will access both the remote management subnet (172.16.0.0/24) and test lab subnet (172.16.1.0/24) through the Ipsec VPN tunnel. SSH access to the remote instances can be done via their private internal IP addresses. Access through port 80, 443 and 8080 are also granted. The remote subnets are not allow to access the office LAN network. ICMP ping from the remote vpn server to the office vpn server is allowed for troubleshooting purpose.
Such a simple example setup can be modified and extended into a production system that can run computing services for a small or medium company.
Data Security in the Public Cloud
One of the key concern about cloud computing is the security of company data in the cloud. Using a public cloud means you need to place a certain level of trust with the cloud provider. The actual physical infrastructure is no longer under your control which is why cloud services are so convenient and easy to use.
If there is sensitive company data involved, each company has got to make their own assessment and judgement. Just how sensitive is this data ? What happens if some or all of it is leaked ? Are there regulatory requirements that has to be met ? What is the risk appetite of the business, is the business able to accept the risk of storing company data in the cloud ? What about other stake holders such as customers and employees ? A company has to consider both the legal and moral responsibilities to these key stake holders.
There are no easy answers to these questions. It is a judgement call of a business. The technical controls that can be implemented to reduce the risk of storing data in the cloud is encryption. Modern strong cryptographic encryption should be used to protect data at rest in the cloud. Data in transit should be encrypted too using a secure transport such as Ipsec and TLS.
In Google Cloud Platform, the persistent disks are automatically encrypted. A customer though can provide his/her own encryption key, but this key again has to be given to the Cloud provider in order for the encryption. Cloud provider also offers key management services, these are just like the HSM (Hardware Security Modules) that companies traditionally used to store sensitive encryption keys. However, the Cloud KMS services are under the control of the Cloud Provider. So a company basically has to trust the Cloud Provider.
Even if a company rolls it own key/secrets management solution and runs this locally. The keys/credentials still have to be sent to the Cloud. For example, a local key management solution may provide a remote Docker Swarm cluster running in the Cloud with a set of credentials and keys for encrypting/decrypting MySQL or MariaDB databases. Docker Swarm has a secret management system that can keep these keys/credentials encrypted at rest. However, when the keys are eventually used by the MySQL or MariaDB or being processed by Docker, they eventually have to be in a decrypted form in physical memory. The Cloud Provider controls the hardware, including the physical memory on their servers.
Google Cloud recently launched Asylo, a framework for using Trusted Execution Environment (TEE) in the cloud. TEEs are hardware assisted secured enclaves that can offer greater assurance of security. It seeks to ensure the remote customer that a secured enclave, with its processing resources and memory cannot be accessed or tampered even by the hypervisor or the host operating system. With TEEs, companies can gain a greater degree of confidence that their data can be secured. No technical implementation whether hardware or software is perfect though. A flaw in the hardware implementation can shattered the security assurance.
Quantum Computing poses another challenge. Modern cryptography relies on certain mathematical properties that are hard to solve computationally. Advances in Quantum Computing can change all this, making the encryption ineffective and breakable. Researchers are researching Quantum Resistant Cryptography. Companies and organizations dealing with sensitive data need to be aware of this to decide whether public cloud is suitable.
For organizations and companies dealing with the most critical data and assets, setting up a private cloud may be a more suitable solution.
Conclusion and Afterthought
Cloud computing offers new convenient ways of doing infrastructure. While many basic fundamentals remain the same, cloud opens up new possibilities and new ways of doing IT. More companies are moving operations to the cloud, implementing a hybrid model which is light on physical IT assets and heavy on software defined infrastructure. IT professionals, security professionals, system administrators and software developers have to adapt to the new model of operations.
Public cloud may not necessarily be suited for all kinds of workloads or tasks. Organizations or companies that deal with highly critical and sensitive data may find a private cloud solution to be more suitable. There are also cases where running your own physical datacentres and hardware is more cost effective than using a public cloud. Dropbox is a case when it actually moves off the cloud into its own private infrastructure to save costs.
Having control over performance can also be a factor for running your own infrastructure. The public cloud is after all a shared infrastructure with multiple tenants. It is possible that an organization may not be able to get the performance that it requires and has to run its own specialized hardware and datacentres.
Some bigger firms and organizations may also find it strategic to maintain their own infrastructure and move only some parts of their operations to the public cloud. They may also want to reduce over reliance and dependency on Cloud Providers for strategic reasons. Building up and nuturing their own internal technical infrastructure competencies can be an important competitive edge in this era of digital economy.
Useful References
- strongSwan, an opensource IPsec VPN. The strongSwan wiki contains documentation on how to setup and configure strongSwan.
- Google Cloud Documentation on Special Configuration, Google Cloud documentation on setting up instances as NAT gateway, VPN gateways etc...
- How to Set Up an IKEv2 VPN Server with StrongSwan on Ubuntu 16.04, A DigitalOcean article on setting up strongSwan VPN.
- How To Set Up an OpenVPN Server on Ubuntu 16.04, a useful DigitalOcean article and tutorial on setting up OpenVPN.
- StrongSwan based IPsec VPN using certificates and pre shared key on Ubuntu 16.04, A howtoforge tutorial on setting up strongSwan Ipsec VPN using PKI certificates authentication.
- Ipsec Implementation in Linux Kernel Stack, a useful article on Linux Kernel Ipsec implementation.
- Google Asylo Framework, An introduction to Asylo framework for TEEs in the cloud.
- Overcoming Asymmetric Routing on Multi-Homed Servers, A linuxjournal article on Asymmetric routing in a linux system, it also has a good explanation on Linux routing policy.
- The Epic Story of Dropbox's Exodus From the Amazon Cloud Empire, Wired article on Dropbox moving into their own infrastructure from the public cloud.
- The Tricky Encryption That Could Stump Quantum Computers, Wired article on Quantum Computing and the search for Quantum Resistant Cryptography.
- NIST Post Quantum Cryptography Project, NIST project to find quantum resistant crytographic algorithms.
- OpenStack, A popular opensource software for building your own Cloud Infrastructure.
If you have any feedback, comments, corrections or suggestions to improve this article. You can reach me via the contact/feedback link at the bottom of the page.
Article last updated on Jan 2019.